Table of Contents
Look, I get it. You’ve ordered scallops at fancy restaurants and thought they were basically magic. That golden crust, the way they just melt in your mouth, that garlic butter situation dripping down the sides—how the hell do they do that?
Here’s the thing nobody tells you: it’s not magic. It’s actually stupidly simple once you know the tricks.
I’m going to show you exactly how to cook scallops with garlic butter at home, and I promise you’ll be shocked at how easy this is. We’re talking 15 minutes from start to finish. And after you make these once, you’re going to be pissed about every time you drop $40 on a plate of four scallops at some restaurant.
The secret? It’s not about fancy technique. It’s about knowing three things that most people get wrong.
Why You Should Actually Learn This
Real talk: restaurants charge you $35-45 for maybe 5 scallops. Their actual food cost? Like $8. Maybe $10 if they’re being fancy about it. You’re literally paying $7 per scallop for something that takes 15 minutes to cook.
Once you learn how to cook scallops with garlic butter yourself, you’ll never be able to justify ordering them out again. It’s like learning that your favorite “artisan” coffee is just espresso with hot milk.
But beyond saving money (though that’s pretty sweet), there’s something else here. Scallops are one of those things that make you look like you really know what you’re doing in the kitchen. Your friends will think you went to culinary school. Your date will be genuinely impressed. Your mom will ask for the recipe.
And nutritionally? They’re kind of perfect. High protein, low carb, packed with omega-3s. About 24 grams of protein per serving with barely any fat (except the butter you add, but we’re not counting that because it’s delicious).
The whole thing—start to finish—takes less time than ordering takeout. I’m serious. Fifteen minutes, max.
What You Need to Know Before You Start
The Dry vs. Wet Scallop Thing (This Is Important, I Promise)
Okay, this is the part where most people screw up, so pay attention.
There are two types of scallops at the grocery store: dry and wet. And no, I’m not talking about whether they’re sitting in liquid (though that’s a clue).
Dry scallops are just… scallops. They’re natural. Nothing added. They look kind of ivory or pale pink, feel a bit sticky when you touch them, and smell like the ocean in a good way.
Wet scallops have been soaked in some chemical solution (sodium tripolyphosphate, if you care) that makes them soak up water like a sponge. Why? Because it makes them heavier (you pay by the pound, so… yeah) and they last longer on the shelf. They’re bright white, sitting in milky liquid, and honestly smell a little weird.
Here’s why this matters: When you throw wet scallops in a hot pan, all that water comes pouring out. And you know what happens when you add water to a hot pan? Steam. Not searing. Your scallops basically boil instead of getting that beautiful golden crust. They turn out gray and rubbery and sad.
Dry scallops? They sear perfectly. Golden brown. Crispy outside, tender inside. Exactly what you want.
Finding them is easy—just ask. Go to the seafood counter and say, “Do you have dry scallops?” or “Are these dry-packed?” They’ll know what you mean. Yes, they cost a bit more. But would you rather pay an extra $2 per pound and have amazing scallops, or save $2 and make something disappointing? Exactly.
Picking the Right Size
You want sea scallops for this. The big ones. Not the tiny bay scallops—those are better for pasta or soup.
At the store, you’ll see them labeled with numbers like “U10” or “U15.” That just means “under 10 per pound” or “under 15 per pound.” Bigger number = smaller scallops. For garlic butter scallops, go for U10 or U15. They’re big enough to get a good sear without overcooking the inside.
When you’re looking at them, here’s what you want:
- They should look a little translucent, kind of pearlescent.
- Firm when you touch them, not mushy
- Smell like the ocean, not like fish.
Got frozen scallops? Totally fine. Just thaw them in the fridge overnight—never on the counter or in warm water. Once they’re thawed, treat them exactly like fresh ones. Just be extra careful about drying them off (more on that in a second).
What You Actually Need
The Shopping List
For the Scallops:
- 1 lb large dry sea scallops (about 12-15 of them)
- Salt and pepper
- 2 tbsp oil that can handle high heat (avocado or grapeseed—I’ll explain why in a sec)
For the Garlic Butter:
- 4 tbsp butter (unsalted is better, so you can control the salt)
- 6 garlic cloves, minced
- Half a lemon (about 2 tbsp juice)
- A handful of fresh parsley, chopped.
- Red pepper flakes, if you like a little kick
- ¼ cup white wine if you’re feeling fancy (totally optional)
Why This Stuff Matters
The butter: Just get regular unsalted butter. The fancy European stuff is nice (higher fat content), but honestly? Regular butter works great. Just make sure it’s unsalted so you’re not guessing at the seasoning.
The garlic: Has to be fresh. I know the pre-minced jar stuff is tempting, but it tastes like disappointment. Fresh garlic takes 30 seconds to mince and makes a huge difference.
The oil: This is actually important. You need oil that won’t smoke when your pan gets really hot. Avocado oil or grapeseed oil both work perfectly. Regular olive oil will start smoking and tasting bitter. Don’t use butter for the initial cooking—it burns too easily at high heat.
The lemon: Fresh squeezed. Bottled lemon juice tastes like plastic. Half a lemon costs like 30 cents.
The parsley: Fresh, not dried. Dried parsley tastes like the stuff you vacuum up from your carpet. If you can’t find parsley, chives work great too.
Kitchen Stuff You’ll Need
- A heavy pan (cast iron or stainless steel—don’t use non-stick, it can’t get hot enough)
- Paper towels (you’ll use a lot, trust me)
- Tongs or a thin spatula (for flipping without destroying your crust)
- A small bowl (for your garlic and herbs)
- Meat thermometer (optional, but helpful if you’re nervous about doneness)
That’s it. Nothing fancy.
How to Cook Scallops Garlic Butter: The Actual Steps
Step 1: Prep the Scallops (This Is More Important Than You Think)
First, check your scallops for this little rectangular muscle tab on the side. Not all of them have it, but if you see it, just peel it off with your fingers. It’s edible but chewy and weird.
Now here’s the most important part of the whole damn thing: dry those scallops like your life depends on it.
I’m serious. Get paper towels and press them all over each scallop. Not a gentle dab—really press. Then put them on a plate lined with more paper towels and just… leave them alone for 15-20 minutes. Let them sit at room temperature.
Why? Two reasons. First, more moisture will evaporate from the surface. Second, cold scallops straight from the fridge don’t cook evenly—you get burnt outsides and raw centers.
Right before you’re ready to cook, pat them dry ONE MORE TIME. I know it seems crazy, but every drop of water on the surface of your scallop is time wasted in the pan. That water has to evaporate before any browning can happen.
Salt and pepper them right before they hit the pan. If you salt them too early, it’ll pull out moisture (and we’ve been working so hard to get rid of moisture).
Step 2: Get That Pan HOT
Put your pan on the stove over medium-high to high heat. Then walk away for 3-4 minutes. Don’t hover. Don’t mess with it. Just let it heat up.
I know this feels wrong—we’re trained to watch pans constantly. But your pan needs to get seriously hot, and that takes time.
How do you know it’s ready? Flick a tiny drop of water into it. If it sizzles and disappears in like a second, you’re good. If it just sits there steaming, keep heating. If it balls up and rolls around, it’s actually too hot—dial it back slightly.
Add your 2 tablespoons of oil and swirl it around to coat the bottom. Wait another 30 seconds until you see the oil start to shimmer—it’ll look kind of wavy. That’s your signal that it’s hot enough (around 400°F).
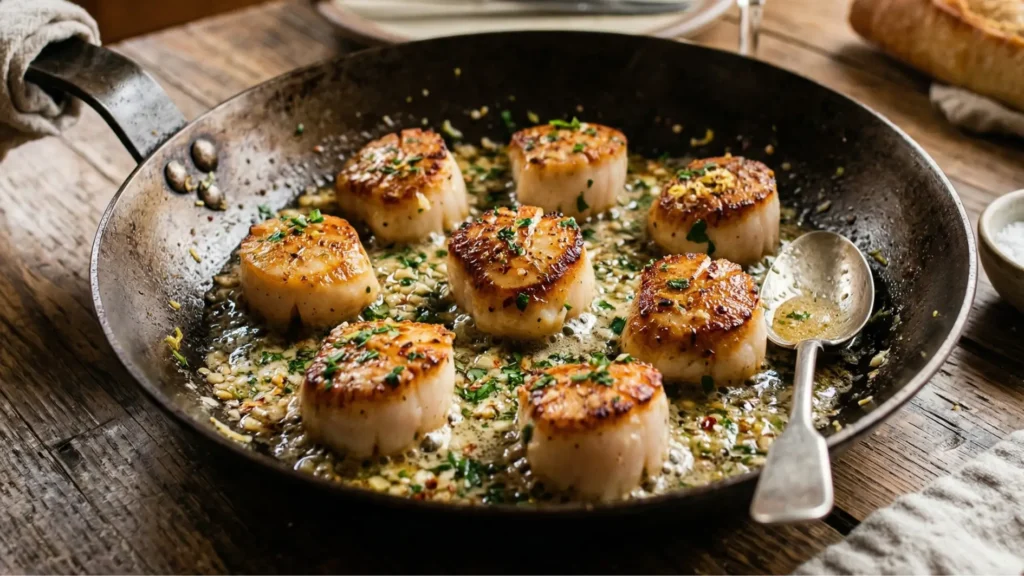
Step 3: Sear the Scallops (Don’t Screw This Up)
Okay, this is where most people panic and mess it up. Don’t be like most people.
Put your scallops in the pan, flat side down, with at least 2 inches of space between them. You should hear a LOUD sizzle immediately. If you don’t hear that sizzle, your pan wasn’t hot enough.
If your pan only fits 6 scallops with proper spacing, cook them in two batches. I know it’s tempting to cram them all in, but if you crowd the pan, the temperature drops and they’ll steam instead of sear. Just don’t do it.
Now here’s the hardest part: LEAVE THEM ALONE.
Don’t touch them. Don’t peek under them. Don’t nudge them to check. Don’t do anything. Set a timer for 2.5 minutes and walk away if you have to.
Watch the sides of the scallops. You’ll see a golden-brown crust creeping up from the bottom, usually about a third of the way up the sides. That’s your cue that they’re ready to flip.
When you go to flip them, they should release from the pan easily. If they’re sticking, they’re not ready yet. Wait another 30 seconds.
Flip each one to the other flat side. Cook for another 1-2 minutes. That’s it. The second side cooks faster because the scallop is already warm inside.
How do you know they’re done? The sides should feel firm but the very center should still have a tiny bit of give when you press it gently. If you have a thermometer, you’re aiming for 120-125°F internal temp. The center will look slightly opaque or even a bit translucent—that’s PERFECT. They’ll keep cooking a bit after you take them out of the pan.
Pull them out and put them on a plate. Don’t leave them sitting in the hot pan, or they’ll overcook.
Step 4: Make the Garlic Butter Sauce
Turn your heat down to medium-low. If you see any really burnt black bits in the pan, wipe them out with a paper towel. The light brown stuff? Keep it—that’s flavor. The black stuff? That’s bitter. Get rid of it.
Drop 2 tablespoons of butter into your still-hot pan. It’ll foam up and sizzle. Swirl the pan to spread it around.
Add your minced garlic and stir it constantly for about 30-60 seconds. You want it to smell amazing and get soft, but NOT brown. If garlic burns, it tastes bitter and ruins everything. Keep stirring.
If you’re using wine (totally optional), pour it in now. It’ll bubble like crazy—that’s normal. Let it cook down for about 1-2 minutes until it’s reduced by half. This gets rid of the harsh alcohol taste and concentrates the flavor.
Add the rest of your butter (2 more tablespoons) and swirl it in. The sauce will start to come together and look glossy.
Squeeze in your lemon juice and toss in the chopped parsley. Stir it all together. Taste it and add salt and pepper if it needs it.
Put your scallops back in the pan for like 30 seconds, just to warm them back up. Spoon that garlic butter all over them.
Done. Seriously, that’s it. Get them on a plate and eat them immediately while they’re hot.
The Mistakes Everyone Makes (And How to Not Make Them)
The 5 Ways People Ruin Scallops
1. Buying wet scallops
I already talked about this, but it’s worth repeating because it’s the #1 reason people fail at this. Wet scallops will never—and I mean NEVER—give you that golden crust. They’re full of water that floods your pan and steams everything. Just ask for dry scallops. That’s it.
2. Not drying them enough
Even dry scallops have moisture on the surface. This is why we pat them dry three times (yes, three). Every single drop of water on your scallop has to evaporate before any browning can start. Why waste pan time evaporating water when you can just dry them off first?
3. Flipping them too early
That beautiful crust forms through a chemical reaction that needs time and heat. If you flip too soon, you literally tear off the crust that’s trying to form. It’s like opening the oven to check on cookies every 30 seconds—just don’t. Leave them alone for the full 2-3 minutes.
4. Overcooking them
Scallops go from perfect to rubber in about 10 seconds. This is why we pull them at 120-125°F when they still look slightly translucent in the center. They’ll keep cooking from their own heat after you take them out of the pan (this is called carryover cooking, if you want to sound smart at dinner parties).
5. Crowding the pan
Every scallop you add drops the pan temperature a bit. Add too many and the temperature crashes below what you need for searing. Then you’re just boiling scallops in their own juice. Cook in batches. It takes an extra 3 minutes, but it’s worth it.
What to Serve With These
You’ve got amazing scallops. Now what goes on the rest of the plate?
Starches:
- Risotto (lemon or mushroom works great)
- Garlic mashed potatoes
- Simple pasta with olive oil and herbs
- Cauliflower mash if you’re doing low-carb
Vegetables:
- Asparagus (sautéed or roasted)
- Brussels sprouts with crispy edges.
- Wilted spinach with garlic
- Grilled zucchini
Wine:
- Chardonnay if you like buttery, rich wines
- Sauvignon Blanc, if you want something lighter
- Champagne if you’re celebrating
- Pinot Grigio for something crisp and clean
Making It Look Nice
Put a small spoonful of the garlic butter sauce on the plate first. Then place your scallops on top of it (this keeps the bottom crust from getting soggy). Drizzle more sauce over the scallops.
Throw some extra parsley on top and maybe a pinch of flaky sea salt if you have it. Put a lemon wedge on the side.
Use warm plates if you can—cold plates cool your scallops down too fast.
Want to Mix It Up? Try These Variations
Once you’ve nailed the basic version, here are some fun twists:
Lemon Herb: Add fresh thyme and tarragon to the butter, plus extra lemon zest
Spicy: Throw in some red pepper flakes and a pinch of cayenne
Asian-Style: Use ginger instead of some of the garlic, add a splash of soy sauce, and sesame oil
Bacon: Cook some bacon first, use the bacon fat to sear the scallops, and add the crispy bacon back to the sauce
Mediterranean: Add sun-dried tomatoes and capers to the butter sauce
Leftovers (If You Somehow Have Any)
Honestly, these are best eaten right away. But if you have leftovers:
Store them in an airtight container in the fridge for up to 2 days. The sauce can go in a separate little jar.
To reheat: Put them in a covered pan over low heat with a tiny splash of water. Warm them gently for 2-3 minutes. DO NOT microwave them—they’ll turn into rubber erasers.
Don’t freeze cooked scallops. The texture gets weird when they thaw.
Questions People Always Ask
How to cook scallops in garlic butter without them sticking to the pan?
Three things: Make sure your pan is crazy hot, dry those scallops completely, and use enough oil to coat the bottom of the pan. Also, scallops will naturally let go of the pan once they develop a crust. If they’re sticking when you try to flip them, they’re not ready—wait another 30 seconds.
Can I use frozen scallops when learning how to cook scallops with garlic butter?
Yeah, frozen is totally fine. Actually, frozen scallops are often frozen right on the boat, so they can be just as good as “fresh” scallops that have been sitting on ice for days. Just thaw them in the fridge overnight (never on the counter). Once they’re thawed, dry them even more thoroughly than fresh ones because all those ice crystals leave extra water behind.
What’s the best oil for cooking scallops with garlic butter?
You need oil that won’t smoke at high heat. Avocado oil or grapeseed oil both work great—they can handle temperatures way above what you need. Don’t use regular olive oil (it’ll smoke and taste bitter) and definitely don’t use butter for the initial sear (it burns). Save the butter for the sauce, where the heat is lower.
How do I know when scallops are perfectly cooked?
Look for a golden-brown crust on both sides, the edges should look opaque, but the very center can still be a tiny bit translucent. If you have a thermometer, 120-125°F is your target. They should feel firm when you press them, but still have a little give in the middle. Total time is usually about 4-5 minutes (2-3 minutes on the first side, 1-2 on the second).
Why are my garlic butter scallops rubbery?
You overcooked them. Scallops go from perfect to rubber really fast—we’re talking seconds. This is why you pull them when they still look slightly undercooked in the center. They’ll finish cooking from their own heat after you take them out. If you cook them all the way through in the pan, they’ll be overcooked by the time you eat them.
Can I make garlic butter scallops ahead of time?
Not really. They’re best right when you make them. BUT—you can prep everything ahead: dry the scallops and keep them in the fridge (covered), mince the garlic, chop the herbs, measure out the butter. Then the actual cooking only takes 5-6 minutes, so you can do it right before you serve.
What’s the difference between dry and wet scallops for garlic butter recipes?
Dry scallops are natural—nothing added. They sear perfectly and get that golden crust. Wet scallops have been soaked in a chemical (sodium tripolyphosphate) that makes them absorb water. This adds weight (you’re paying for water) and makes them last longer on the shelf. But all that water prevents them from browning properly—they steam instead of sear and end up gray and rubbery. Always get dry scallops.
How many scallops per person for a main course?
isFigure 4-6 large sea scallops per person for a main dish (that’s about 5-6 ounces). For an appetizer, 2-3 scallops is enough. The U10 or U15 size (that’s 10-15 scallops per pound) are your best bet—they’re big enough to make an impression.
The Bottom Line
You just learned how to cook scallops with garlic butter. Like, actually learned it. Not just read about it.
And honestly? It’s not that hard. It’s basically:
- Buy dry scallops
- Dry them like crazy
- Get your pan stupid hot.
- Don’t touch them for 2-3 minutes.
- Make a simple butter sauce.
That’s it. Five things. And now you can make a dish that restaurants charge $40 for.
Think about it—you’re probably going to spend less than $20 on ingredients (even with good scallops) and end up with something that tastes better than what you’d get at most restaurants. Because you’re cooking it exactly how you like it, in your own kitchen, without waiting for a table or dealing with a rushed server.
The first time you make these, you might be a little nervous. That’s normal. But by the second or third time? You’ll be showing off. Your friends will ask for the recipe. Your family will request these for special dinners. You’ll start looking for excuses to make them.
Here’s the thing about learning how to cook something impressive: it changes how you think about cooking. If you can nail scallops, you can probably nail a lot of other things, too. The same principles apply—high heat, patience, don’t overcook. It’s not magic. It’s just technique.
So tonight, or this weekend, or whenever you get to the store, grab some dry scallops. Get that garlic and butter. Clear 20 minutes in your schedule. And just do it.
You’ve got this. And in 15 minutes, you’re going to be eating restaurant-quality scallops that you made with your own hands.
What are you waiting for?
Read Also:
- Quick and Easy Grilled Salmon Caesar Salad for Busy Weeknights
- Easy Weeknight Butterflied Portuguese Chicken Recipe That Tastes Like a Lisbon Grill House
- The Best Chicken Alfredo Wraps Recipe Busy Families Will Make on Repeat

How to Cook Scallops Garlic Butter Perfectly at Home
Ingredients
Method
- INSTRUCTIONS
- Prep the Scallops:
- Remove scallops from packaging and check each one for a small rectangular side muscle. Peel it off with your fingers if present.
- Pat scallops completely dry with paper towels, pressing firmly on all sides. Don’t just dab—really press to absorb moisture.
- Place scallops on a paper towel-lined plate and let rest at room temperature for 15 minutes. This allows surface moisture to evaporate and brings them to room temp for even cooking.
- Just before cooking, pat dry one final time. Season both sides with salt and pepper.
- Heat the Pan:
- Place a heavy-bottomed pan (cast iron or stainless steel) over medium-high to high heat. Let it preheat for 3-4 minutes without touching it.
- Test readiness by flicking a drop of water into the pan—it should sizzle and evaporate immediately.
- Add 2 tablespoons of oil and swirl to coat the pan. Wait 30 seconds until the oil shimmers.
- Sear the Scallops:
- Place scallops in the pan flat side down, spacing them at least 2 inches apart. You should hear a loud, immediate sizzle. If your pan won’t fit all scallops with proper spacing, work in batches.
- DO NOT TOUCH the scallops for 2-3 minutes. Let them develop a golden crust undisturbed. You’ll see the crust creeping up the sides—when it reaches about ⅓ of the way up, they’re ready to flip.
- Flip each scallop using tongs or a thin spatula. They should release easily from the pan. If they stick, wait another 30 seconds.
- Cook the second side for 1-2 minutes only. The scallops should feel firm when gently pressed but still have slight give in the center. The inside should look slightly opaque or translucent—this is perfect.
- Remove scallops to a plate immediately. Don’t leave them in the hot pan.
- Make the Garlic Butter Sauce:
- Reduce heat to medium-low. If there are any black burnt bits in the pan, wipe them out with a paper towel (keep the light brown bits—that’s flavor).
- Add 2 tablespoons of butter to the pan. It will foam and sizzle. Swirl to distribute.
- Add minced garlic and stir constantly for 30-60 seconds. The garlic should become fragrant and soft but NOT browned. Burnt garlic will make the sauce bitter.
- Optional: Add ¼ cup white wine. It will bubble vigorously. Let it reduce by half, about 1-2 minutes, scraping up any browned bits from the pan.
- Add the remaining 2 tablespoons of butter, swirling to incorporate. The sauce will become glossy and cohesive.
- Squeeze in fresh lemon juice and stir in chopped parsley. Taste and adjust seasoning with salt and pepper if needed.
- Return scallops to the pan for 30 seconds only, spooning the garlic butter sauce over them to warm them back up.
- Serve immediately on warm plates with extra sauce spooned over the top.