The Ultimate Fluffy Hoe Cakes Recipe: Southern Comfort Made Simple
Want to know how to make hoe cakes so fluffy they’ll make your grandma proud? I’ve spent years perfecting these golden cornmeal beauties, and I’m finally ready to spill all my secrets.
Table of Contents
A Taste of Southern Heritage
There’s nothing like the smell of cornmeal and butter hitting a hot skillet on a lazy Sunday morning. That sizzle? Music to my ears. It means I’m about 15 minutes away from biting into something magical.
These humble cornmeal pancakes might look simple, but nailing that perfect balance—crispy edges with a pillowy center—took me more failed batches than I care to admit. The good news? You get to skip my disaster phase and go straight to the good stuff.
What makes these hoe cakes special isn’t fancy equipment or hard-to-find ingredients. It’s all about how you treat those simple pantry staples and a few tricks my grandmother taught me that I’m betting nobody ever told you.
I was a decent cook for years before I learned the real secret to hoe cakes. It wasn’t until I spent a weekend with my friend’s 80-year-old aunt in rural Georgia that I realized what I’d been doing wrong all along. She took one look at my technique and just shook her head. “Honey,” she said, “you’re working that batter way too hard.” Everything changed after that weekend.
Whether you grew up on these golden discs of happiness or you’re trying them for the first time, I promise these might be the best breakfast you’ll make all year. They connect you to generations of Southern cooks while being dead simple to pull off in your kitchen right now.
What Are Hoe Cakes? Understanding the Southern Classic
Before we get into the how-to, let’s talk about what makes these different from regular pancakes and why they’ve stuck around for centuries.
The Story Behind the Name
Hoe cakes go way back to early America, when enslaved people in the South had to make do with whatever they had. The name comes from their original cooking method—they’d mix up cornmeal, water, and salt, then cook the batter on the metal blade of a field hoe held over a fire.
Pretty resourceful, right? What started as survival food eventually became something families across the South looked forward to. The recipe has evolved (thank goodness we can use actual pans now), but that core of transforming simple cornmeal into something special remains the same.
I think about this history every time I make them. My great-grandmother used to say food carries stories, and these humble cakes certainly come with their share.
What Makes a Perfect Hoe Cake?
When I judge a great hoe cake, I’m looking for five things:
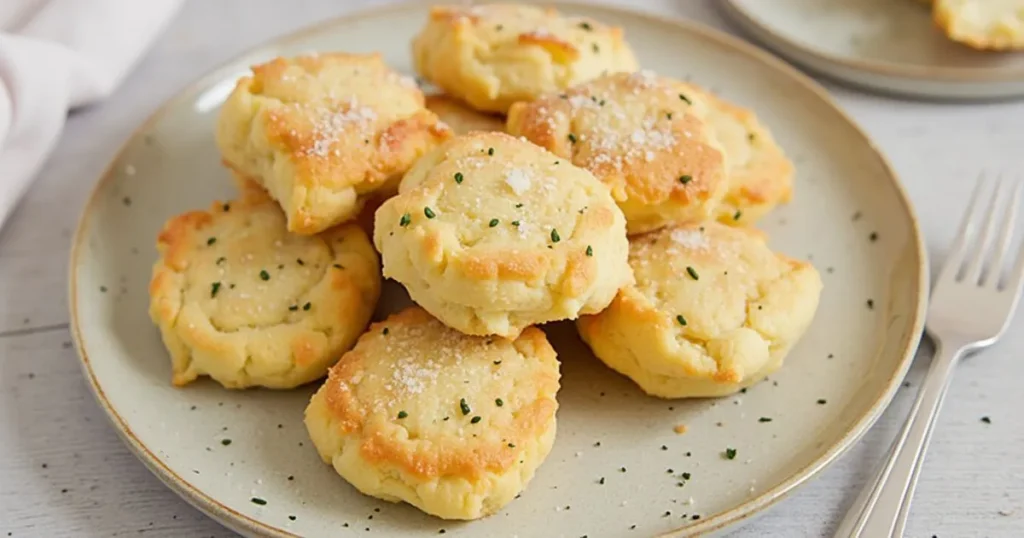
- A golden-brown exterior with just enough crunch when you bite in
- An inside so light it practically melts in your mouth
- That sweet corn flavor that reminds you of summer
- Just a hint of sweetness that doesn’t overwhelm
- Sturdy enough to hold toppings but never tough or dense
In my early attempts, I’d either end up with cornmeal frisbees or soggy, undercooked centers. After countless Saturday mornings of trial and error (and my family’s polite but pained expressions), I finally cracked the code.
The secret isn’t just in the ingredient list—it’s in the little details like ingredient temperature, how gently you mix, giving the batter a rest, and knowing exactly when to flip. Master these, and you’ll have people begging for your recipe.
What You’ll Need: Ingredients Breakdown
Let’s talk ingredients. Nothing fancy here—just pantry staples working together to create something spectacular:
| Ingredient | Amount | Why It Matters |
|---|---|---|
| Yellow cornmeal | 1 cup | The star of the show. Gives that distinct corn flavor and hearty texture |
| All-purpose flour | 1 cup | Lightens everything up—all cornmeal would be too dense |
| Sugar | 2 tablespoons | Just enough to enhance the corn flavor without making it too sweet |
| Baking powder | 1½ teaspoons | The main rising agent—don’t skimp here |
| Baking soda | ½ teaspoon | Works with the buttermilk for extra lift |
| Salt | ¾ teaspoon | Brings out all the flavors (yes, even the sweet ones) |
| Buttermilk | 1¼ cups | Adds tang and activates the leavening agents |
| Eggs | 2 large | Creates structure and adds richness |
| Melted butter | 3 tablespoons | For flavor and tenderness |
| Honey or maple syrup | 1 tablespoon | My secret weapon—adds depth you can’t get from sugar alone |
Can’t find buttermilk? No problem. Mix 1¼ cups milk with 1 tablespoon vinegar or lemon juice and let it sit for 5 minutes. Works like a charm every time.
Not a fan of honey? Maple syrup works great too. In a pinch, brown sugar dissolved in a teaspoon of warm water adds similar complexity.
The Science Behind Fluffy Hoe Cakes
I’m not normally a science person, but understanding these three principles transformed my hoe cakes game:
- Double-action leavening: The baking powder starts working as soon as it gets wet, while the baking soda kicks in more when heated. This one-two punch creates maximum fluffiness.
- Buttermilk magic: The acid in buttermilk reacts with baking soda to create tiny air bubbles. Room temperature buttermilk works better than cold—I learned this the hard way after wondering why my winter morning batches weren’t as fluffy.
- Gentle mixing = tender cakes: Unlike bread where you want to work the gluten, hoe cakes need minimal handling. Every time you stir, you’re developing gluten that makes them tough and popping those precious air bubbles.
Once I understood these basics, I could adapt to any kitchen situation instead of blindly following instructions. Trust me, knowing the “why” behind cooking makes you so much better at it.
Let’s Make Some Hoe Cakes!
Alright, let’s get to the good part—actually making these beauties.
Quick Time Guide
- Prep: 15 minutes
- Resting time: 10 minutes (non-negotiable!)
- Cooking: 20 minutes
- Total time: 45 minutes
- Makes: 12-14 hoe cakes (enough for 4-5 hungry people)
What You’ll Need
Grab these before you start:
- Two mixing bowls
- Measuring cups and spoons
- Whisk and rubber spatula
- Cast-iron skillet (preferred) or any good pan
- ¼-cup measuring cup or ladle
- Wire cooling rack
A quick note about cast iron: You don’t need it, but it helps create that perfect contrast between crispy outside and tender inside. If you don’t have one, don’t let that stop you—just use the heaviest skillet you’ve got.
Step 1: Mix the Dry Stuff
In your larger bowl, whisk together:
- 1 cup yellow cornmeal
- 1 cup all-purpose flour
- 2 tablespoons sugar
- 1½ teaspoons baking powder
- ½ teaspoon baking soda
- ¾ teaspoon salt
Take about 30 seconds to really whisk this well. You don’t want little pockets of baking soda surprising you later. Been there, tasted that—not pleasant.
Step 2: Mix the Wet Stuff
In your second bowl, gently whisk:
- 1¼ cups buttermilk
- 2 large eggs
- 3 tablespoons melted butter (slightly cooled)
- 1 tablespoon honey or maple syrup
If you’ve got time, pull the buttermilk and eggs out of the fridge 20 minutes before starting. Room temperature ingredients blend better and create fluffier cakes. If you forgot (like I often do), no worries—your hoe cakes will still be good, just maybe not quite as epic.
Step 3: Create Your Batter
This is where the magic happens—and where most people mess up:
- Pour wet ingredients into dry ingredients
- Using your spatula (not the whisk!), fold everything together with a light hand
- Stop mixing the second you don’t see dry flour anymore
- Embrace the lumps—they’re your friends!
Here’s where my Georgia kitchen lesson paid off: When you think you should stir one more time, don’t. That extra stir is the difference between fluffy cloud cakes and tough hockey pucks.
Step 4: Let It Rest
Now walk away for 10 minutes. Seriously. Set a timer and don’t touch it.
This resting time isn’t optional—it’s where the cornmeal softens and the leavening agents get to work. I used to skip this step because I was impatient (and my family was hungry), but trust me, these 10 minutes make all the difference.
While you wait, clean up your prep mess or get your toppings ready. Might as well be productive, right?
Step 5: Heat Your Pan
Now for the cooking surface:
- Put your skillet over medium heat
- Give it 3-5 minutes to get properly hot
- Test it with a few water droplets—they should dance around, not instantly vaporize
- Add a small pat of butter and swirl it around
Getting the temperature right is tricky but crucial. Too hot, and you’ll have burnt outsides with raw centers. Too cool, and your cakes will soak up all the butter without browning properly. The water droplet test is foolproof—dancing droplets mean you’re at about 350°F, which is perfect.
Step 6: Cook ‘Em Up
Time to make some hoe cakes:
- Using your ¼-cup measure, pour batter onto the hot surface
- Leave plenty of room between cakes—they’ll spread
- Wait until bubbles form across the top and edges look set (about 2-3 minutes)
- Flip once with a thin spatula
- Cook another 1-2 minutes until golden brown underneath
Don’t press down on them while cooking! I know it’s tempting, but you’ll squish out all those air bubbles we worked so hard to create. And resist the urge to flip them multiple times—once is enough.
Step 7: Finish Up
As each batch finishes:
- Transfer them to your wire rack
- Add a tiny bit more butter to the pan before the next batch
- Adjust heat as needed if they’re cooking too fast or slow
- If you’re feeding a crowd, keep finished cakes warm in a 200°F oven on a wire rack over a baking sheet
The wire rack is key—it keeps steam from condensing underneath and making them soggy. Nothing worse than doing all this work for soggy-bottomed hoe cakes!
Serving Ideas: Taking Your Hoe Cakes to the Next Level
Now for the fun part—dressing them up! While they’re delicious with just a pat of butter, here are some ways to serve them that’ll make people think you’re a genius:
Classic Southern Style
These traditional toppings are classics for a reason:
- Good butter with a honey drizzle
- Pure maple syrup (the real stuff, please)
- Cane syrup or sorghum if you can find it
- Homemade fruit preserves (peach is my personal favorite)
- Butter mixed with a little molasses
Modern Twists I Love
When I’m feeling fancy, I’ll try:
Sweet versions:
- Fresh berries with a dollop of whipped mascarpone cheese
- Sliced bananas, toasted pecans, and cinnamon-honey butter
- Warm spiced apples with a spoonful of vanilla crème fraîche
- Peaches sautéed with a bit of bourbon (for the adults!)
- Nutella and strawberries when I’m feeling indulgent
Savory options:
- Avocado, crispy bacon, and an egg with runny yolk
- Pulled pork and tangy slaw (amazing for lunch!)
- Smoked salmon with crème fraîche and fresh dill
- Black bean and corn salsa with a drizzle of lime crema
- Crumbled chorizo, queso fresco, and pickled jalapeños
The beauty of hoe cakes is their versatility. That subtle corn flavor works as well with sweet toppings as it does with savory ones, making them perfect for any meal of the day.
Troubleshooting: When Things Go Wrong
Even after years of making these, I still have the occasional flop. Here’s how to fix common issues:
| Problem | What Probably Happened | How to Fix It |
|---|---|---|
| Heavy, dense cakes | Overmixed the batter or old leavening agents | Mix less next time; check that baking powder/soda aren’t expired |
| Pale cakes that seem undercooked | Pan wasn’t hot enough | Increase the heat; make sure pan preheats fully |
| Burnt outsides, raw centers | Pan too hot | Lower the heat; give the pan time to adjust between batches |
| Flat cakes with no fluff | Skipped the rest period or old leavening | Never skip the rest; replace baking powder/soda every 6 months |
| Tough, rubbery texture | Overmixing | Stop mixing sooner—a few lumps are good! |
| Sticking to the pan | Not enough butter or pan not hot enough | Make sure pan is properly preheated; add more butter between batches |
| Uneven browning | Uneven heat or inconsistent batter amounts | Use a heavy pan; measure batter the same for each cake |
Remember, even “bad” hoe cakes are usually pretty good. My first attempts were far from perfect, but my family ate them anyway!
Storing Leftovers (If You Have Any!)
While hoe cakes are best fresh off the griddle, life happens. Here’s how to deal with extras:
Same-Day Storage
Got a few hours until serving?
- Let them cool completely on the wire rack
- Place in an airtight container with parchment between layers
- Keep at room temperature up to 8 hours or refrigerate up to 3 days
Freezing for Later
For longer storage:
- Cool completely
- Wrap each cake individually in plastic wrap
- Place in a freezer bag
- Freeze up to 2 months
- Label with the date (trust me, you’ll forget otherwise)
Bringing Them Back to Life
Different ways to reheat:
- Toaster: My favorite for 1-2 cakes. Quick and creates nice crispy edges.
- Oven: Heat oven to 350°F, warm for 5-7 minutes on a baking sheet.
- Skillet: Low heat with a tiny bit of butter restores the original texture.
- Avoid the microwave: It makes them gummy and sad.
Make-Ahead Shortcut
Short on morning time?
- Mix all dry ingredients ahead of time
- Store in an airtight container labeled “Hoe Cake Mix”
- When ready to cook, just add the wet ingredients
This has saved many busy mornings in my house!
Nutrition Facts (For Those Who Need to Know)
I’m not one to count calories when enjoying comfort food, but here’s the info per serving (2 cakes) if you need it:
| Nutrient | Amount |
|---|---|
| Calories | 245 |
| Protein | 6g |
| Carbs | 37g |
| Fiber | 2g |
| Sugars | 6g |
| Fat | 8g |
| Saturated Fat | 4g |
| Cholesterol | 62mg |
| Sodium | 465mg |
Hoe cakes aren’t diet food, but they provide good energy through complex carbs and some protein. They’re similar to other breakfast foods nutritionally, so enjoy them as part of a varied diet.
Healthier Versions (That Still Taste Good)
I’m all for traditional recipes, but sometimes we need lighter options. Here are some tweaks that don’t sacrifice flavor:
Whole Grain Option
Want more fiber?
- Replace half the all-purpose flour with whole wheat flour
- Adds a nice nutty flavor that works well with maple syrup toppings
- The texture changes slightly but in a pleasant way
Less Sugar Version
Watching your sweet intake?
- Cut the sugar to 1 tablespoon
- Add ¼ cup mashed ripe banana for natural sweetness
- A dash of cinnamon tricks your taste buds into thinking there’s more sweetness
Dairy-Free Adaptation
Can’t do dairy?
- Replace buttermilk with almond milk plus 1 tablespoon vinegar
- Use coconut oil instead of butter
- Choose fruit toppings instead of dairy-based ones
Gluten-Free Alternative
Need to avoid gluten?
- Use a 1:1 gluten-free flour blend
- Double-check your cornmeal is certified gluten-free
- Add ¼ teaspoon xanthan gum if your flour blend doesn’t include it
- Let the batter rest for 15 minutes instead of 10
I’ve made all these versions for various friends and family members, and while slightly different from the original, they’re still delicious.
Final Thoughts: Why Hoe Cakes Matter
There’s something special about transforming humble ingredients into something memorable. Perfect hoe cakes aren’t about fancy techniques or hard-to-find ingredients—they’re about understanding the basics and treating simple foods with respect.
What makes these cornmeal cakes extraordinary isn’t complexity but simplicity done right. The techniques I’ve shared come from generations of Southern cooks who knew how to make the most of what they had. When you make these, you’re connecting to that tradition while creating something that satisfies modern tastes.
I love the contrast between the golden-crisp edges and those cloud-like centers. Few breakfast foods manage that kind of textural magic, especially with such basic ingredients.
Best of all, once you get the hang of these techniques, you’ll have them forever. You’ll never need another hoe cakes recipe again. Instead, you’ll be the one passing these secrets on to others.
So this weekend, gather your ingredients and give it a try. Pay attention to the details, trust the process, and enjoy watching people’s faces when they take that first perfect bite. Then share the recipe—because food traditions matter most when passed along.
Have you made hoe cakes before? What’s your favorite topping? Drop a comment below and let me know how yours turned out!
Quick Answers to Common Questions
Why are they called “hoe cakes”?
They got their name from enslaved people in early America cooking cornmeal batter on the metal blades of field hoes held over fire. Without proper cooking equipment, they used what they had available. Pretty ingenious, right? Today we use skillets instead of garden tools, but the name sticks around as a reminder of their resourceful origins.
Can I make these without buttermilk?
Absolutely! Mix one cup of regular milk with a tablespoon of white vinegar or lemon juice, stir, and let it sit for five minutes. You’ll see it thicken slightly and look a bit curdled—that’s perfect. This homemade “buttermilk” works just as well in the recipe and saves you a trip to the store when you get a sudden hoe cakes craving.
What’s the difference between hoe cakes and johnnycakes?
Think of it as a regional difference. New England johnnycakes (especially Rhode Island style) are usually thinner and crispier, often made with just cornmeal, water, and salt. They’re almost like cornmeal crepes. Southern hoe cakes include flour, eggs, and leavening agents, making them fluffier with a more pancake-like texture. I’ve tried both and love them for different reasons, but these fluffy hoe cakes are my go-to comfort food.
Why are my hoe cakes dense instead of fluffy?
Three likely culprits: First, you might be overmixing the batter—stop the second the dry ingredients disappear. Second, did you skip the 10-minute rest? That’s non-negotiable for fluffiness. Third, check your baking powder and soda. If they’ve been in your pantry more than six months, they might be dead. Test baking powder by putting a pinch in hot water—it should bubble immediately if it’s still good.
Can I make the batter ahead of time?
I don’t recommend making the complete batter ahead—the leavening starts working immediately and won’t wait for you. But you can mix all dry ingredients and store them in your pantry for up to three months. Then just add the wet ingredients when you’re ready to cook. I do this all the time for busy weekday breakfasts—it cuts prep time in half!
Are hoe cakes gluten-free?
Traditional ones aren’t, but they’re easy to adapt. Use a good 1:1 gluten-free flour blend instead of all-purpose flour, and make sure your cornmeal is certified gluten-free (some are processed in facilities with wheat). With those two swaps and a slightly longer rest period, your gluten-free hoe cakes will be nearly identical to the original version. I make these for my cousin with celiac disease, and she says they’re the closest to “regular” pancakes she’s had.


