Table of Contents
Let me be honest with you — I used to be terrified of baking for other people.
Not because I couldn’t cook. But there’s something about setting a homemade dessert in front of a table full of guests that feels oddly vulnerable. What if it’s dry? What if it collapses? What if everyone smiles politely and leaves half of it on their plate?
Then I made a flourless chocolate cake for the first time. Bought it for a dinner party. Watched it disappear in under ten minutes. Got three texts the next day asking for the recipe.
That was four years ago. I’ve made it at least thirty times since — for birthdays, holidays, last-minute dinner parties, and once, memorably, for a Tuesday night when I just really needed chocolate. It has never once let me down.
Here’s what I want you to know before we get into the recipe: this cake is not hard. At all. It uses seven ingredients, one bowl, and about 30 minutes of your actual time. The oven does the rest. What comes out looks like something from a French patisserie window. Nobody needs to know how simple it was. That part is entirely up to you.
What Even Is a Flourless Chocolate Cake?
If you’ve never made one before, the concept might sound a little suspicious. No flour? Then what holds it together?
The answer is eggs, good chocolate, and chemistry. When you whisk eggs into warm melted chocolate and bake the whole thing low and slow, something genuinely magical happens. The proteins in the eggs set around the fat from the chocolate and butter, creating a structure that’s dense and fudgy rather than light and cakey. The result is somewhere between a brownie, a truffle, and a soufflé — and it is absolutely extraordinary.
It also happens to be naturally gluten-free, which means you don’t have to bake a separate dessert for the guests at your table who can’t eat wheat. One cake. Everyone’s happy. That alone makes it worth keeping in your back pocket.
A Bit of Background
This style of cake has roots in Italian and French baking, where flour-free desserts have long been associated with elegance and restraint. It became especially popular as a Passover dessert — since Jewish dietary law prohibits leavened grains during the holiday — but it’s long since broken free of that association and landed firmly in the category of year-round, occasion-worthy baking.
You’ll find versions of it on the menus of serious restaurants. You’ll also find it at home bakers’ dinner tables everywhere, made by people who discovered what you’re about to discover: that it’s one of the most forgiving, rewarding, low-effort, high-impact things you can bake.
The Ingredients (And Why Each One Matters)
This is not a recipe where you can swap things out carelessly. With only seven ingredients, every single one is pulling serious weight. Here’s what you need and why it matters:
| Ingredient | Quantity | Why It Matters |
|---|---|---|
| Dark Chocolate (70%+) | 200g / 7 oz | This is the flavor. Buy the best you can afford. |
| Unsalted Butter | 115g / ½ cup | Adds richness and helps create that fudgy texture |
| Granulated Sugar | 150g / ¾ cup | Sweetness and structure — don’t reduce it too much |
| Large Eggs | 4 whole | The binding agent — must be room temperature |
| Unsweetened Cocoa Powder | 2 tbsp | Deepens the chocolate flavor without adding sweetness |
| Pure Vanilla Extract | 1 tsp | Rounds out the bitterness of the dark chocolate |
| Fine Sea Salt | ¼ tsp | Non-negotiable. Salt makes chocolate taste more like itself. |
On the Chocolate Specifically
Please don’t use chocolate chips here. They’re formulated with stabilizers that stop them from melting smoothly, and smooth is exactly what you need. Buy a bar — Lindt 70%, Ghirardelli Intense Dark, Valrhona if you’re feeling generous with yourself — and chop it up. The difference in flavor is significant.
Want to Add Something Extra?
These are optional, but each one does something genuinely interesting to the final cake:
- Espresso powder (½ tsp) — you won’t taste coffee, but you’ll taste more chocolate. Trust it.
- Orange zest (1 tsp) — chocolate and orange is a classic pairing for good reason
- A pinch of cayenne — sounds strange, tastes incredible. Adds a warmth that sneaks up on you.
- Almond extract (¼ tsp) — gives it a slightly marzipan-adjacent depth that feels very fancy
Dietary Swaps That Actually Work
| If you need to replace… | Use this instead. Works | Works for… |
|---|---|---|
| Butter | Refined coconut oil | Dairy-free |
| Sugar | Monk fruit sweetener | Keto |
| Eggs | Flax eggs (1 tbsp ground flax + 3 tbsp water, rested 5 mins) | Vegan |
| Regular chocolate | Quality dairy-free dark chocolate | Vegan / dairy-free |
What You’ll Need in the Kitchen
Nothing unusual here. You probably already have most of this:
- 9-inch springform pan — this is the one piece of equipment worth insisting on. It lets you release the cake cleanly without flipping it or wrestling with it.
- Double boiler or heatproof bowl over a saucepan — for melting your chocolate gently without scorching it
- Hand or stand mixer — for beating the eggs properly
- Rubber spatula — for folding without overworking
- Parchment paper — line the bottom of your pan. Don’t skip this.
- Fine mesh sieve — for that beautiful dusting of cocoa powder on top at the end
No springform pan? A regular 9-inch round pan works too. Just line it really well with parchment and let the cake cool fully before you try to remove it.
How to Make It — The Full Recipe
First, a Few Things to Do Before You Start
- Preheat your oven to 325°F (163°C)
- Grease your springform pan and press a parchment circle into the base.
- Take your eggs out of the fridge now, if you haven’t already. Cold eggs hitting warm chocolate mixture is a recipe for scrambled eggs in your batter. Room temperature makes all the difference.
The Steps
1. Melt your chocolate and butter. Use a double boiler, or place a heatproof bowl over a pot of barely simmering water. Stir gently until everything is melted together and completely smooth. You can also do this in the microwave in 30-second bursts — just stir between each one and stop when there are just a few lumps left. The residual heat will take care of those. Let the mixture cool for about five minutes before moving on.
2. Whisk in the sugar. Add your sugar to the warm chocolate mixture and whisk until dissolved. It’ll feel slightly gritty at first — keep going. It smooths out.
3. Add your eggs, one at a time. This is the most important step. Add them slowly, whisking well after each one. You’re building a structure here and you want each egg fully incorporated before the next one goes in. Don’t rush it.
4. Fold in the cocoa powder, vanilla, and salt. Switch to your spatula. Add these three and fold gently until just combined. The batter should look glossy and smooth. Stop mixing the moment you don’t see any dry streaks.
5. Pour into your pan and tap it. Tap the pan firmly on the counter a few times after pouring. This knocks out air bubbles and gives you a more even bake.
6. Bake for 25–30 minutes. Set your timer for 25 and start checking. The edges should look set and be pulling slightly away from the sides of the pan. The center should have a gentle, even jiggle — not sloshing around, but not rock solid either. Think set Jell-O.
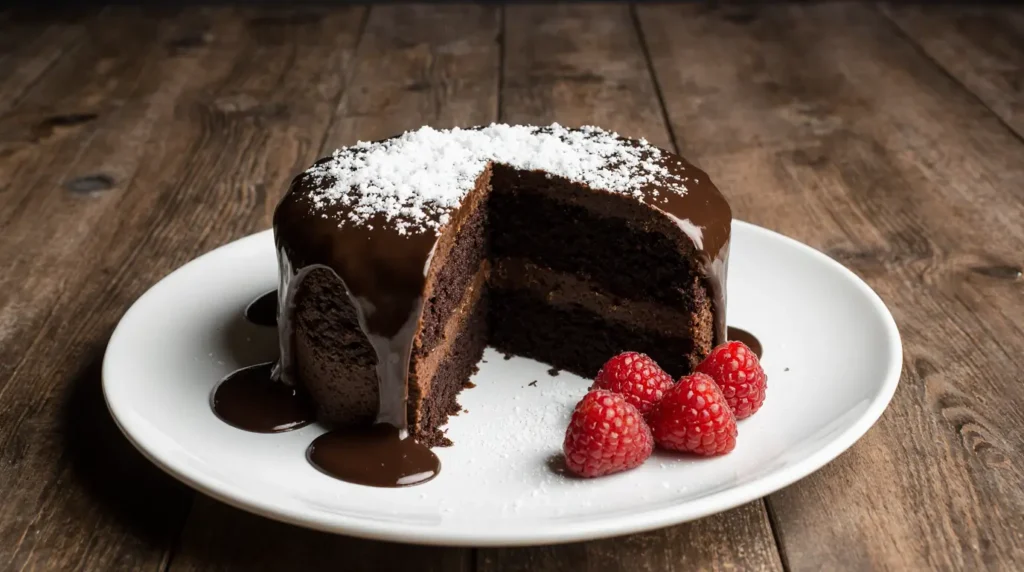
7. Cool. Completely. I know. It smells incredible. You want to cut into it immediately. Don’t. The cake needs at least an hour in the pan at room temperature before you even think about removing it. It’s still setting. Cutting it early is the single most common mistake people make with this cake and it will break your heart.
8. Unmold and garnish. Run a thin knife around the edge, unclip the springform, and transfer the cake to your serving plate. Now you get to make it beautiful.
The Jiggle Test — How to Know It’s Ready
Shake the pan gently. The edges should be completely still. The center should move as one unit — a slow, even wobble. If it’s rippling like liquid, it needs more time. If you have an instant-read thermometer, you’re looking for 140–150°F (60–65°C) in the center.
Please Don’t Do These Things
- Don’t overbake it. An overbaked flourless chocolate cake is dry and crumbly and loses all the magic. When in doubt, take it out early.
- Don’t open the oven door before the 25-minute mark. Temperature drops can cause it to sink.
- Don’t use cold eggs. Seriously, the scrambled egg situation is real.
- Don’t skip the parchment. It will stick. It will break. You will be sad.
- Don’t cut corners on the chocolate. Everything else here is forgiving. The chocolate is not.
Making It Look Like It Came From a Bakery
Here’s a secret that professional pastry chefs know and home bakers often forget: presentation is mostly just confidence and a few simple techniques. You don’t need skill. You need the right moves.
Garnish Ideas by Occasion
| Garnish | Difficulty | Best For |
|---|---|---|
| Cocoa powder + powdered sugar dusted through a stencil | Very Easy | Dinner parties, elegant simplicity |
| Fresh raspberries and a few mint leaves | Very Easy | Valentine’s Day, summer gatherings |
| Chocolate ganache poured warm over the top | Easy | Birthdays, celebrations |
| Edible gold leaf pressed gently onto the surface | Easy | Anniversaries, weddings, anything that deserves drama |
| Whipped cream piped around the edges | Easy | Crowd-pleaser for any occasion |
| Thin candied orange slices standing upright | Moderate | Christmas, festive dinners |
A Few Plating Tips Worth Knowing
Hot knife, clean slices. Dip your knife in a glass of hot water, wipe it dry, then cut. Do this between every single slice. It makes a genuinely shocking difference to how clean the edges look.
Dark plate, light garnish. Serve on a dark plate with a dusting of powdered sugar or a scattering of raspberries. The contrast is striking.
A little something alongside. A small scoop of vanilla ice cream, a spoonful of crème fraîche, or even just a swirl of lightly whipped cream elevates the whole plate from good to memorable.
Planning Ahead — Because Stress-Free Hosting Is a Gift You Give Yourself
The Best News You’ll Read Today
This cake is better the next day. Not just “fine” or “still good” — actually better. The flavor deepens overnight. The texture becomes more settled and even more fudgy. If you make it 24 hours before you need it, you will not regret that decision.
You can bake it up to three days in advance. Cover it tightly once it’s fully cooled and refrigerate. Pull it out an hour before serving to let it come back to room temperature.
Storage at a Glance
| Method | How Long | What to Know |
|---|---|---|
| Room temperature | 2 days | Cover tightly, keep away from heat |
| Refrigerator | Up to 5 days | Wrap in plastic first, then foil |
| Freezer | Up to 3 months | Slice first, wrap each slice individually |
Freezing Done Right
Freeze it before you add any garnishes. Wrap each slice individually in plastic wrap, pop them into a freezer bag, press the air out, and seal. When you want one, move it to the fridge the night before and let it come to room temperature for an hour before eating. It comes back beautifully.
Variations Worth Trying
Once you’ve made the classic version and fallen in love with it — and you will — here’s how to riff on it for different occasions:
- 🍓 Valentine’s Day — bake it in a heart-shaped pan, serve with a fresh raspberry coulis and a few dried rose petals scattered around the plate
- 🎂 Birthdays — pour a warm chocolate ganache over the top, add gold sprinkles, and stick in some candles. Simple and spectacular.
- 🕍 Passover — the classic recipe is already perfectly suited. Add orange zest for brightness.
- 🎄 Christmas — a few drops of peppermint extract in the batter and a scattering of crushed candy cane on top
- 💍 Anniversaries — individual mini cakes baked in a muffin tin, topped with edible gold. Genuinely romantic.
- 🍂 Thanksgiving — fold in ½ tsp cinnamon and a tiny pinch of cardamom. Serve with spiced whipped cream.
For Different Diets
Keto version: swap the sugar for monk fruit sweetener in equal quantities, use a sugar-free dark chocolate bar. The texture is slightly different but still deeply satisfying.
Vegan version: flax eggs in place of real eggs, refined coconut oil instead of butter, and a good dairy-free dark chocolate. It works better than you’d think.
Paleo version: coconut sugar, grass-fed ghee, and a pure 70%+ dark chocolate bar with no additives.
Nutrition (Per Slice, Based on 10 Servings)
| Nutrient | Approximate Amount |
|---|---|
| Calories | ~320 kcal |
| Total Fat | 22g |
| Saturated Fat | 12g |
| Carbohydrates | 26g |
| Sugar | 21g |
| Protein | 5g |
| Fiber | 2g |
| Sodium | 85mg |
These are estimates — exact values depend on the specific brands and quantities you use.
Questions People Actually Ask
Why did my cake sink in the middle? A small dip in the center is completely normal and honestly kind of charming — it’s where you pour the ganache or pile the raspberries. A dramatic collapse usually means the oven door was opened too early or the cake was underbaked. Don’t panic, it still tastes incredible.
Can I make this without eggs? Yes — use flax eggs. For each egg, combine 1 tablespoon of ground flaxseed with 3 tablespoons of water, stir, and let it sit for five minutes until it thickens. The texture will be slightly denser, but the cake will still hold together and taste wonderful.
Is it really safe for people with celiac disease? There’s no flour in this recipe, so yes — but check every ingredient label if you’re baking for someone with celiac. Chocolate bars, cocoa powder, and vanilla extract can all have hidden gluten from shared manufacturing equipment. Look for certified gluten-free labels to be safe.
What’s the difference between this and a chocolate torte? Mostly just terminology. A torte traditionally uses ground nuts as the binder; a flourless chocolate cake uses eggs and chocolate alone. They’re in the same family — dense, rich, not overly sweet — but this version has an especially fudgy, almost ganache-like interior that most tortes don’t quite match.
How far ahead can I really make this? Three days in the fridge is the practical limit, but honestly, one day ahead is the sweet spot. The flavor is at its best after about 18–24 hours. Make it the night before, go to bed, and let time do you a favor.
What’s the best chocolate to use? Any quality dark chocolate bar with 60–70% cocoa content. Lindt 70%, Ghirardelli Intense Dark, Valrhona Caraibe, and Callebaut are all excellent choices. Avoid anything labeled “baking chips” — the texture won’t be right.
Can I double the recipe for a larger crowd? Yes — double everything and bake in two pans rather than one deeper pan. The baking time stays roughly the same. Two cakes also give you something to stack if you want to get ambitious with a ganache filling in between.
Final Thoughts
Here’s the truth: this flourless chocolate cake has gotten me out of more last-minute situations than I can count. It’s the recipe I reach for when I want to show up somewhere and actually make an impression. It’s the one I make for people I want to feel taken care of.
And it never stops surprising me — that something this simple can taste this good. Those seven ingredients and 30 minutes of effort can produce something that makes people close their eyes on the first bite.
You don’t need to be a skilled baker to make this. You just need to follow the steps, use good chocolate, and resist the urge to cut into it before it’s cooled. That’s genuinely it.
Make it once, and you’ll understand why it’s stayed in my rotation for years. Make it twice and it’ll be in yours too.
If you try this recipe, leave a comment and tell me what occasion you made it for — I love hearing how it lands. And if you have a variation that works brilliantly, share it. The best recipes are the ones that keep evolving. 🍫