Table of Contents
You know that feeling when you bite into something so damn good you actually close your eyes? That happened to me in a cramped Seoul bakery at 7 AM on a Tuesday, jet-lagged and cranky, waiting in a line that snaked out the door.
I almost bailed. Twenty people ahead of me for donuts? Really? But everyone looked so happy, clutching their little white boxes, and the smell wafting out was insane. So I stayed.
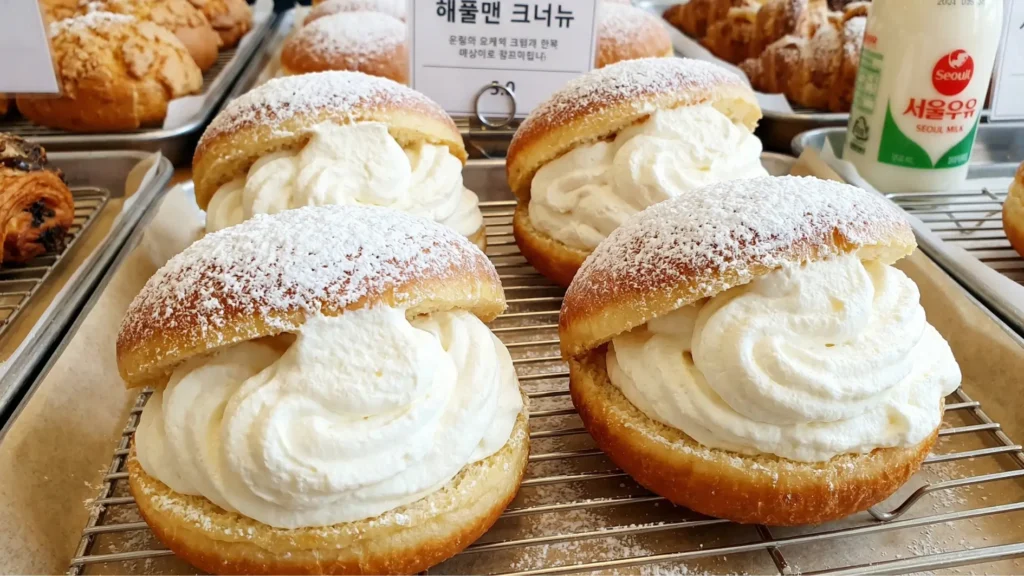
When I finally got mine and took that first bite outside on the street, I just… stopped walking. The donut was warm still, unbelievably soft, and when my teeth broke through, fresh cream literally oozed out. Not that thick, sweet frosting that coats your mouth. Just pure, light, barely-there sweetness that made me want to cry a little bit.
I ate three more standing on that sidewalk like a crazy person.
The thing is, you don’t need to fly to Korea or master some impossible technique to make these at home. This Korean milk cream donuts recipe is honestly pretty straightforward once you get the hang of it. I’ve made it probably fifty times now—for friends, for my kids’ bake sales, sometimes just because it’s Sunday and I want my house to smell like a bakery.
If you’ve been watching these donuts blow up on TikTok and Instagram and thinking “yeah, but I could never,” I’m here to tell you: you absolutely can. Let me show you how.
What Makes These Donuts Different From Regular Ones?
Okay, real talk. Most donuts you buy at chain shops are… fine. They’re sweet, they’re fried, they do the job. But they’re also kind of dense and heavy, loaded with glaze or frosting that’s basically pure sugar, and they get stale by the afternoon.
Korean milk cream donuts are a completely different animal.
The dough uses this technique from Japanese milk bread that makes it ridiculously soft and pillowy. I’m talking “pull it apart and watch it stretch like mozzarella” soft. My friend Sarah, who’s normally all about her keto diet, ate four of these and just shrugged like “what can you do?”
And the filling—this is key—isn’t pudding or custard. It’s fresh whipped cream with a small amount of sugar. In Korea, they call it “uyu cream,” which literally means “milk cream.” Sounds simple because it is. But that simplicity is the whole point. You taste the donut, you taste the cream, and they’re not fighting each other for attention.
The result? You can polish off two or three without feeling like you need a nap afterward. They’re substantial enough to be satisfying but light enough that you’re not groaning on the couch twenty minutes later.
Plus, let’s be honest—they look amazing. That moment when you bite down, and cream squeezes out both sides? Instagram gold. No wonder these things went viral.
What You’ll Need to Make These
Let’s hit the grocery store. Most of this stuff you probably have already, and the rest is basic.
For the Donuts Themselves
- 3 cups all-purpose flour (375g if you’re weighing) – Don’t stress about bread flour vs. all-purpose. I’ve used both and honestly can’t tell the difference.
- ¼ cup sugar (50g) – Just regular white sugar, nothing fancy
- 2¼ teaspoons instant yeast (one packet) – Check the expiration date! Old yeast is where dreams go to die.
- 1 teaspoon salt – Please don’t skip this. Unsalted dough tastes like nothing.
- 2 eggs – Bring them to room temperature, or they won’t mix properly
- ¾ cup whole milk (180ml) – Warm it up, not hot, just warm to the touch
- ¼ cup butter (60g) – Unsalted, and let it soften on the counter
- 1 teaspoon vanilla extract – The real stuff, not imitation
For the Cream Filling
- 2 cups heavy whipping cream (480ml) – Must say “heavy” on the carton. Regular whipping cream won’t work.
- ¼ cup powdered sugar (30g) – Dissolves way better than granulated sugar
- 1 teaspoon vanilla extract
- 2 teaspoons gelatin powder plus 2 tablespoons water – This is your secret weapon. Don’t skip it.
- 2 tablespoons sweetened condensed milk (optional) – Adds that authentic Korean bakery taste
For Frying
- About 6 cups of vegetable or canola oil – or whatever neutral oil you’ve got. I buy the cheap stuff
- Sugar for rolling – A bowl of regular white sugar
One thing I learned the hard way: don’t cheap out on the heavy cream. I tried once with “light whipping cream” because it was on sale, and the whole thing flopped. You need the fat content to make this work.
Equipment You Actually Need
You don’t need a fancy kitchen, but a few tools make this way less annoying:
- Stand mixer with a dough hook – Or just plan on getting your arm workout for the day.
- A deep pot – Heavy-bottomed is best because the temperature stays steady.
- Candy thermometer – This is the one thing you really can’t wing. Guessing oil temperature is how you burn everything
- Piping bag – A gallon Ziploc with the corner cut off works fine.
- Rolling pin
- Cookie-cutter or glass – About 3 inches across
- Baking sheets
- Wire rack – For draining the fried donuts
- Slotted spoon – To fish donuts out of the oil
The thermometer thing is serious. I resisted buying one for months because I’m cheap, and I wasted so much oil and ruined so many batches. Finally caved and bought a $12 one from Target. Life-changing.
Let’s Actually Make These Things
Alright, here we go. Put on some music, maybe grab a coffee, and let’s do this.
Getting the Dough Started
First, warm your milk to about 110°F. If you don’t have a thermometer, it should feel warm on your wrist but not hot. Mix in a teaspoon of the sugar, dump in your yeast, give it a stir, and walk away for ten minutes.
When you come back, it should look foamy and alive—kind of like the head on a beer. If nothing happened, your yeast is dead, and you need to start over. This is why we test it first instead of mixing everything and hoping for the best.
Throw your flour, the rest of the sugar, and salt into your mixer bowl. Make a little well in the middle and pour in the yeast mixture, eggs, and vanilla. Turn it on low and let it mix until it looks like a shaggy mess.
Now add your butter, one chunk at a time. Don’t rush this part. Let each piece incorporate before adding the next one. Once all the butter’s in, bump it up to medium speed and let it run for about eight to ten minutes.
You’re looking for smooth, elastic dough that’s slightly tacky but not sticky. There’s this thing called the windowpane test—take a small piece of dough and gently stretch it. If you can stretch it thin enough to see light through it without it tearing, you’re golden.
The Waiting Game (First Rise)
Grease a big bowl with some oil, plop your dough in there, and turn it around so it’s coated. Cover it with plastic wrap or a damp towel.
Now you wait. Depending on how warm your kitchen is, this takes an hour to an hour and a half. You want it to double in size.
Here’s how to tell if it’s ready: poke it with your finger about halfway. If the dent slowly springs back but leaves a little dimple, perfect. If it springs back immediately, give it more time. If it doesn’t spring back at all, you might’ve let it go too long, but it’ll probably still be okay.
I usually set a timer for an hour, then check every fifteen minutes after that. Use this time to clean up, scroll through your phone, whatever.
Shaping Time
Dump your puffy dough onto a floured counter. Give it a good punch—this is weirdly satisfying. Roll it out to about half an inch thick. Try to keep the thickness even.
Grab your cutter and start punching out circles. Press straight down without twisting. Twisting seals the edges, and they won’t rise as well.
You should get about twelve to fourteen from the first roll. Gather up the scraps, smoosh them together gently, and cut a few more. Don’t re-roll more than once, though—the dough gets tough.
Put all your circles on baking sheets lined with parchment paper, leaving a couple of inches between them. Cover loosely with plastic wrap.
The Second Wait (Almost There)
This rise is shorter—thirty to forty-five minutes. Your donuts should look noticeably puffier and feel light when you touch them gently.
My trick: shake the baking sheet a little. The donuts should jiggle like they’re barely holding together. That’s exactly what you want.
Frying (The Fun Part)
Pour your oil into a deep pot—you need at least three inches. Clip your thermometer to the side and heat it to 350°F.
This temperature is weirdly specific, but it matters. Too cool, and your donuts soak up oil like sponges and get greasy. Too hot and they burn on the outside while staying raw inside. That 340-360°F range is your target.
Gently slide two or three donuts into the oil. Don’t crowd them. They should float right away.
Fry for about sixty to ninety seconds on the first side. You’re watching for that deep golden brown color. Flip them and fry another minute or so on the other side.
Pull them out with your slotted spoon and put them on a wire rack lined with paper towels.
The oil temperature drops with each batch, so keep an eye on your thermometer and adjust the heat as needed. This back-and-forth is why frying takes attention—you can’t just dump everything in and walk away.
Making the Cream
While your donuts cool down (they need to be completely cool before filling), make your cream.
Mix the gelatin with cold water in a small bowl. Let it sit for three minutes until it looks blobby and weird. Microwave it for ten seconds to melt it.
In another bowl, pour in your cold heavy cream and powdered sugar. Beat it on medium-high until it starts to thicken and hold soft peaks.
Pour in your melted gelatin while still beating. Add the vanilla and condensed milk if you’re using it. Keep beating until you get stiff peaks—the cream should stand up straight when you lift the beaters.
Stick it in the fridge while you wait for the donuts to cool. This is important—if you fill warm donuts, the cream will melt, and you’ll have a mess.
Filling and Finishing
Scoop your cream into a piping bag or that Ziploc with the corner cut off.
Hold a donut in your hand. Use a chopstick or the tip of your bag to poke a hole about halfway into the side. Push your piping tip into that hole, aiming toward the center of the donut.
Squeeze steadily. You’ll feel the donut get heavier and slightly firm up. When you see a little bit of cream peeking out from where you poked the hole, you’re done. Usually takes two to three good squeezes.
Roll the filled donut in sugar, coating all sides. Repeat until they’re all done.
Now eat one immediately while it’s still fresh. This is mandatory. It’s for quality control.
Things I Learned By Screwing Up
Dense, heavy donuts? You didn’t let them rise enough. I know it’s boring to wait around, but rushing the rises gives you bread, not donuts. The dough really does need to double.
Cream everywhere? Either you skipped the gelatin (don’t do that) or you filled them while they were still warm. Room temperature donuts only.
Uneven browning? Your oil temperature is jumping around too much. Fry fewer at a time and let the oil recover between batches.
Greasy donuts? Oil was too cool. Get that thermometer.
I’ve made literally every one of these mistakes. Some of them multiple times because apparently I’m slow to learn. Save yourself the trouble and just trust me on this stuff.
Ways to Mix It Up
Once you’ve nailed the basic version, you can mess around with the cream.
Add a tablespoon of matcha powder for green tea cream. Fold in some melted chocolate for chocolate cream. Mix in strawberry puree and a drop of red food coloring for strawberry cream.
I made Earl Grey cream once by steeping tea bags in the warm cream, straining it, chilling it completely, then whipping it as usual. My friend Emma lost her mind over those.
For the coating, cinnamon sugar is great if you want them to taste like churros. Or skip the sugar entirely and dust them with powdered sugar for a fancier look.
Keeping Them Fresh
Unfilled donuts stay good at room temperature in a container for about two days. They’re best within twelve hours, though.
Once you fill them, put them in the fridge. They’ll last one to two days, but honestly, they’re best within twenty-four hours. Let them sit out for ten minutes before eating so the cream isn’t rock hard.
The cream by itself keeps for three days in the fridge.
My usual move: fry the donuts Saturday afternoon, leave them unfilled. Sunday morning, whip up fresh cream and fill them right before people come over. Tastes fresh-made without the morning chaos.
Your Most Burning Questions
Can I just bake these?
Sure, but they won’t be the same at all. You’ll get something closer to sweet rolls. The whole point of Korean milk cream donuts is that crispy-soft contrast from frying. If you hate frying, maybe try a different recipe?
My dough won’t rise. Help.
Check your yeast date. Seriously, this is usually the problem. Also, make sure your liquid wasn’t too hot—anything over 120°F kills yeast. And find a warmer spot in your house. I stick mine in the oven with just the light on.
Do I really need the gelatin?
Yes. Without it, your cream will weep liquid, and your donuts will get soggy within hours. With it, they stay perfect for days. It’s worth the extra three minutes.
Can I make the dough ahead?
Totally. After the first rise, punch it down, wrap it tight in plastic, and refrigerate it up to twenty-four hours. When you’re ready, let it come to room temperature for an hour, then shape and do the second rise. Actually tastes better this way.
What if I don’t own a piping bag?
Ziploc bag with the corner cut off. Works the same. Or use a squeeze bottle if you have one.
How do I know they’re cooked through?
They should be deep golden brown and feel light, not heavy. If you’re paranoid, stick a thermometer in the center—it should read 190°F. But honestly after a few batches, you’ll just know by looking.
Why You Should Make These This Weekend
Look, I’m not going to lie and say this recipe is quick. It’s not. Between the rising and the frying and the filling, you’re looking at about three and a half hours start to finish.
But here’s the thing—most of that time is just waiting around. The actual hands-on work is maybe forty-five minutes. You can clean your kitchen, watch TV, or do whatever while the dough rises.
And the payoff is incredible. I’m talking about donuts that rival anything you’d pay six bucks each for at some trendy bakery. I’m talking about your friends texting you days later, asking when you’re making them again.
My kid’s teacher asked me for the recipe after I sent them for a class party. My neighbor “randomly” drops by on Sunday mornings now. My husband, who normally doesn’t care about desserts, ate five in one sitting and just shrugged when I looked at him like “what?”
These donuts also teach you real skills. The dough technique works for cinnamon rolls, dinner rolls, and any enriched bread. The cream stabilization helps with layer cakes, cream puffs, all sorts of stuff. You’re not just making donuts—you’re leveling up your whole baking game.
But mostly? It’s just fun. There’s something deeply satisfying about making something from scratch that people only expect to get at fancy bakeries. That moment when someone bites in, and their eyes go wide—that’s why we do this.
So yeah. Clear your Saturday. Tell your family you’re busy. Put on your comfiest clothes and your favorite playlist. Make these donuts.
Your weekend is about to get a lot better.
Ready to do this? Save this recipe somewhere you’ll actually find it again. Set a date. Buy the ingredients. And when you make them—and they turn out amazing because they will—share a picture. Tag it #KoreanMilkCreamDonuts so I can see what you made. And seriously, if you try any flavor variations, tell me in the comments which one was your favorite.
Now go make something delicious.
Read Also:
- Easy Turtle Caramel Cake Recipe That Tastes as if It Came from a Bakery
- Quick and Easy Cheesecake Cupcakes Recipe for Beginner Bakers
- The Best Apple Crisp Cheesecake Bread Recipe for Family Gatherings

Easy Korean Milk Cream Donuts Recipe for Weekend Baking
Ingredients
Method
- STEP 1: Activate the Yeast (10 minutes)
- Warm the milk to 110°F (43°C). It should feel warm to the touch but not hot—like bathwater.
- Pour the warm milk into a small bowl or measuring cup.
- Add 1 teaspoon of the sugar to the milk and stir gently.
- Sprinkle the yeast over the milk mixture.
- Give it a gentle stir and let it sit undisturbed for 5-10 minutes.
- What to look for: The mixture should become foamy and bubbly on top, like the head on a beer. This means your yeast is alive and active.
- Troubleshooting: If nothing happens after 10 minutes, your yeast is dead. Toss it and start over with fresh yeast. Check the expiration date!
- STEP 2: Make the Dough (15 minutes)
- In the bowl of your stand mixer, combine:
- 3 cups flour
- Remaining sugar (about 3 tablespoons)
- 1 teaspoon salt
- Whisk together briefly to combine.
- Create a well in the center of the dry ingredients.
- Add to the well:
- The foamy yeast mixture
- 2 eggs (room temperature)
- 1 teaspoon vanilla extract
- Attach the dough hook to your mixer.
- Mix on low speed for 2-3 minutes until everything comes together into a shaggy, rough dough.
- With the mixer still running on low, add the softened butter one tablespoon at a time. Wait for each piece to incorporate before adding the next.
- Once all the butter is added, increase speed to medium.
- Knead for 8-10 minutes. The dough should pull away from the sides of the bowl and look smooth and elastic.
- The Windowpane Test: Tear off a small piece of dough. Gently stretch it between your fingers. If you can stretch it thin enough to see light through it without it tearing, you’re done. If it tears immediately, knead for another 2-3 minutes.
- Hand-Kneading Option: If you don’t have a stand mixer, mix ingredients in a large bowl with a wooden spoon until combined, then turn out onto a floured surface and knead by hand for 12-15 minutes. The dough is ready when it’s smooth, elastic, and passes the windowpane test.
- STEP 3: First Rise (1-1.5 hours)
- Lightly grease a large bowl with butter or oil.
- Shape your dough into a smooth ball and place it in the greased bowl.
- Turn the dough over so all sides are lightly coated with oil. This prevents a dry skin from forming.
- Cover the bowl tightly with plastic wrap or a damp kitchen towel.
- Place in a warm, draft-free spot. Good options:
- Near (not on) a warm stove
- In an oven with just the light on
- In a sunny spot on your counter
- In a turned-off oven with a bowl of hot water on the bottom rack
- Let rise for 1 to 1.5 hours, until doubled in size.
- How to tell it’s ready: Gently press your finger about ½ inch into the dough. If the indentation slowly springs back but leaves a small dimple, it’s perfect. If it springs back immediately, give it more time. If it doesn’t spring back at all, you’ve let it go a bit too long (but it’ll still be okay).
- Temperature matters: Ideal rising temperature is 75-80°F. In a cold kitchen, rising can take 2+ hours. Be patient—don’t rush this step.
- STEP 4: Shape the Donuts (15 minutes)
- Lightly flour your work surface.
- Punch down the dough gently to release air bubbles. This is oddly satisfying.
- Turn the dough out onto your floured surface.
- Using a rolling pin, roll the dough to an even ½-inch thickness. Work from the center outward for consistent thickness.
- Dip your 3-inch cookie cutter in flour (prevents sticking).
- Cut out circles by pressing straight down—don’t twist! Twisting seals the edges and prevents proper rising.
- Place cut donuts on parchment-lined baking sheets, spacing them about 2 inches apart.
- Gather the scraps, gently press them together (don’t overwork), and roll out one more time. Cut additional donuts.
- Pro tip: Don’t re-roll more than once. The dough gets tougher with repeated handling.
- Cover the shaped donuts loosely with plastic wrap or a clean kitchen towel.
- What about donut holes? You can cut out centers with a 1-inch cutter if you want traditional ring donuts, but Korean milk cream donuts are traditionally filled rounds. Save the scraps and fry them as “donut holes” for snacking.