Table of Contents
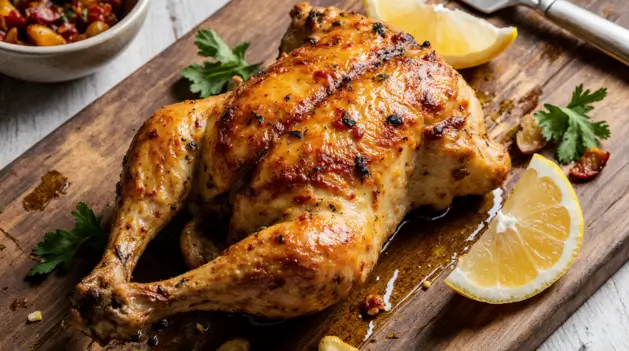
There’s something almost magical about the smell of peri peri chicken on the grill. You know the one—that intoxicating mix of charred lemon, smoky paprika, and just enough chili heat to make your mouth water before you’ve even taken a bite. It’s the kind of smell that stops your neighbors mid-lawn-mowing to ask what the hell you’re making over there.
I’m talking about proper butterflied Portuguese chicken—the kind that’s been marinated until it can’t absorb another drop of flavor, then grilled until the skin crackles and those edges get almost dangerously dark (but not burnt, never burnt). This isn’t your average Tuesday night chicken breast situation. This is the recipe you pull out when you want people to shut up and eat.
Here’s what you need to know upfront: this takes time. Not active time—you’re not slaving over a stove—but patience. The marinade needs hours, preferably a full day or two. But if you’re willing to plan, what you get is chicken so good it makes expensive restaurant versions taste like sad cafeteria food.
Let’s get into it.
The Real Story Behind Butterflied Portuguese Chicken
First things first—”Portuguese” chicken is kind of a misnomer. The Portuguese get the credit, but this dish was born in Africa, specifically Mozambique and Angola, back when Portugal was busy colonizing half the world.
Here’s the weird part: Portuguese traders brought chili peppers to their African colonies around 200 years ago, but they couldn’t figure out how to sell them back home in Portugal. So these peppers just… stayed in Africa. The locals started doing incredible things with them, especially in Mozambique, where they created what we now call peri peri sauce.
The original version from a town called Beira was stupid simple—lemon juice, water, bird’s eye chilies, slow-cooked for like 10-12 hours until everything mellowed and married together. No garlic, no oil, just pure chili and citrus slowly becoming something greater than the sum of its parts.
Fast forward to the 1960s, and Portuguese chicken finally became a thing in Portugal itself. Then Nando’s came along and turned it into a global phenomenon. Now everyone and their mother has a peri peri recipe, and honestly? Most of them are pretty good. The beauty of this dish is that it’s hard to screw up as long as you nail the basics: acid, heat, time, and fire.
The name changes depending on where you are—peri peri in Mozambique, pili pili in Congo, piri piri in Portugal—but it’s all the same delicious concept.
How to Butterfly a Chicken (And Why You Should)
Okay, butterflying sounds fancy and chef-y, but it’s actually dead simple. You’re just taking out the backbone and flattening the bird. Some people call it spatchcocking, which sounds even fancier but means exactly the same thing.
Why bother? Three reasons:
It cooks way faster. A whole roasted chicken takes over an hour. A butterflied one? 35-40 minutes, tops.
Everything cooks evenly. No more dried-out breasts while you wait for the thighs to finish. Flat chicken means uniform thickness, which means uniform cooking.
Crispy skin everywhere. When the whole bird is flat against the grill or pan, every inch of skin gets direct heat. No sad, flabby skin hiding on the underside.
Here’s How You Actually Do It
Get yourself some good kitchen shears—the kind that feel sturdy, not the flimsy ones from the dollar store. A sharp knife works too if that’s what you’ve got.
Flip your chicken so it’s breast-side down on a cutting board. You’ll see the backbone running down the middle, kind of knobby and obvious.
Starting at the butt end (technical term: tail end, but come on), cut along one side of that backbone. You’re cutting through ribs here, so it takes a little pressure. Work your way up toward the neck. Here’s a tip nobody tells you: cut around the tenderloins—those little nuggets of meat along the backbone—not through them. Keep that meat on the bird where it belongs.
Now cut along the other side of the backbone and pull it free. Chuck it in a bag in the freezer. When you’ve collected a few, make stock. Waste not.
Flip the chicken over so it’s breast-side up. Now press down hard on the breastbone with both hands—you want to hear a crack as the cartilage breaks and the bird flattens out. It’s weirdly satisfying.
Adjust the legs so they’re pointing forward, same direction as the breasts, and you’re done. Flat chicken. Took you maybe three minutes once you got past the initial “I’m going to mess this up” anxiety.
Not Feeling the Whole Chicken Thing?
Look, I get it. Sometimes you just want to buy a package of thighs and be done with it. That works fine. The marinade doesn’t care whether it’s coating a whole bird or individual pieces. Just adjust your cooking time down a bit—bone-in thighs need about 30-35 minutes, breasts maybe 25-30.
You lose the dramatic presentation of bringing a whole butterflied bird to the table, but you gain convenience. Pick your battles.
Making a Peri Peri Marinade That Actually Tastes Like Something
This is where things get real. The marinade is everything. It’s the difference between “yeah, that’s pretty good” and “holy shit, can you make this every week?”
The Pepper Situation
Traditional peri peri uses bird’s eye chilies—those tiny little bastards that pack serious heat. We’re talking 30,000-50,000 Scoville units, which is hot but not “why am I doing this to myself” hot.
Problem: most regular grocery stores don’t stock fresh bird’s eye chilies. You can find them dried, or at Asian markets, but not everyone has easy access.
So here are your options, ranked by heat:
Red finger chilies (40,000-60,000 Scoville): Hotter than traditional, but authentic if you can find them.
Fresno peppers (5,000-10,000 Scoville): This is my go-to. They’re everywhere, they’re cheap, and they give you that fruity chili flavor without destroying anyone’s palate. Think jalapeño heat level, maybe a touch milder.
Regular jalapeños work too, though they taste more grassy than fruity.
Dried bird’s eye chilies: If you can only find these, great. Soak them in warm water for 10 minutes first to rehydrate.
Here’s the heat control trick: the seeds and white pithy parts are where most of the capsaicin lives. Want it mild? Cut them out. Want it spicy? Leave them in. Want to dial it back after the fact? Add a tablespoon of white vinegar or a halved, seeded red bell pepper to the marinade to stretch it and tame the fire.
What You Actually Need
For one whole chicken (3.5-4 pounds):
- 3-6 fresh chilies, depending on size and heat preference
- 10 garlic cloves (yeah, really)
- 1 small shallot, or half a medium onion
- Juice from 2 lemons (5-6 tablespoons)
- 2 teaspoons paprika (regular is fine, smoked is great, sweet works too)
- 1 cup olive oil (or avocado oil if you’re feeling fancy)
- Coarse salt
That’s it. Nine ingredients. No exotic imports, no weird stuff from specialty stores.
Blending It Together
Roughly chop your peppers, garlic, and shallot—doesn’t need to be pretty, it’s all going in a food processor. Toss them in with the lemon juice and paprika.
Now here’s the important part: turn on the processor and slowly drizzle in that oil while it’s running. You’re making an emulsion, like a vinaigrette. If you dump all the oil in at once, you get a separated, watery mess. If you drizzle it slowly, you get a thick, creamy marinade that clings to the chicken instead of running off.
Once it’s all blended, hit it with salt. And then—this is crucial—taste it. Stick a spoon in there and actually taste it. Does it need more salt? More lemon? Is it too spicy, not spicy enough? Fix it now, because this is your flavor blueprint for the whole dish.
The Secret Pre-Marinade Step
Before that gorgeous sauce touches your chicken, you need to do this: pat the bird completely dry with paper towels. Seriously dry. Moisture is the enemy here.
Squeeze a whole lemon over it—all over, under the skin, everywhere. Massage it in like you’re giving the chicken a spa day. The acid starts breaking down proteins, which tenderizes the meat.
Then hit it with coarse salt. Don’t be shy—you’re seasoning almost 4 pounds of meat. You’ll use 2-3 tablespoons easy. Again, get under that skin.
Let this sit for 25-30 minutes. The salt pulls moisture out, then sucks it back in along with all that lemon juice. It’s basic brining science, and it makes a massive difference.
Marinade Time
Remember how you made enough marinade for a whole chicken? Cut it in half. One-half goes on the bird now. The other half gets covered and stuck in the fridge—you’ll cook it down later for a finishing sauce.
Pour your marinade all over the pre-salted chicken and get your hands dirty. Really work it into every surface, under the skin, into every crevice. Don’t be polite about it.
Now the hard part: waiting. Minimum 4 hours in the fridge. But honestly? 24-48 hours is where the magic happens. The longer it sits, the deeper those flavors penetrate. If you’re doing overnight or longer, flip it once in a while so all sides get equal love.
Three Ways to Cook This Thing
You’ve got options. They all work. They all make great chicken. Pick the one that fits your situation.
The Grill (Best Option)
Grilling is how this chicken is meant to be cooked—fire, smoke, char, all of it.
Crank your gas grill to high and let it preheat to 550°F. While that’s happening, pull your chicken out of the fridge and let it sit on the counter for 30 minutes. Cold chicken on a hot grill = uneven cooking and a sad you.
Slap that bird skin-side down on the grates, then immediately drop the heat to medium (looking for 400-425°F). Close the lid, wait 5-6 minutes.
Open it up, rotate the chicken 90 degrees for those Instagram-worthy crosshatch marks, close the lid, another 5-6 minutes.
Now flip it. You’re going to see some dark, almost black spots on the skin. This is correct. This is caramelization. This is flavor. Burnt chicken is black and tastes like charcoal and regret. Caramelized chicken is deep brown with charred edges and tastes like happiness. Learn the difference.
From here on out, you’re basting every 10 minutes with that cooked-down sauce (we’ll get to that in a second). Total cook time is 35-40 minutes. You’re looking for 165°F internal temp in the thickest part of the breast. I pull mine at 161-162°F because carryover cooking is real and overcooked chicken is a crime.
The Oven (Easiest Option)
No grill? No problem. Oven works great.
Preheat to 400°F. Line a sheet pan with parchment paper. Put your marinated chicken on it skin-side up.
That’s it. Don’t flip it. Just let it roast for 45-50 minutes, basting with extra sauce every 15 minutes if you’re feeling motivated.
The skin won’t have grill marks, but it’ll crisp up nice if you don’t cover it or mess with it too much.
The Smoker (Flavor Bomb Option)
If you’re running a smoker, crank it hotter than you normally would—at least 500°F. This dish wants heat and a kiss of smoke, not low-and-slow. Follow the grilling timeline, about 35-40 minutes, basting regularly.
That Finishing Sauce Situation
While your chicken cooks, take that second half of marinade out of the fridge. Dump it in a small pot. Rinse out the container with about half a cup of water to get every last bit of flavor, add that to the pot too.
Cook this over medium-low heat for 20-30 minutes, stirring now and then. You’re doing two things: concentrating the flavors as liquid evaporates, and cooking the raw garlic and shallot until they lose that harsh bite and get sweet and mellow.
This cooked sauce is your basting liquid and your final drizzle. It’s what makes this taste like restaurant peri peri instead of just grilled chicken with hot sauce.
The Side Dish You Didn’t Know You Needed
Mozambican coconut rice is stupid easy and pairs perfectly with spicy chicken. The creamy coconut cools down the heat, and the fluffy rice soaks up extra sauce like a champ.
You need:
- 2 cups long-grain rice
- 2 cups water
- 1¾ cups full-fat coconut milk (one can)
Here’s the trick: toast the dry rice in a pot over medium-high heat for 3-4 minutes, stirring constantly. It’ll go from cloudy to bright white. Don’t let it brown—you’re just drying it out and waking up the starches.
While the rice toasts, boil your water and coconut milk together in another pot. Once the rice hits that bright white stage, pour in the boiling liquid (carefully—it bubbles up like crazy).
Stir once, bring it back to a boil, drop the heat to low, cover, and leave it alone for 12-13 minutes. No peeking. No stirring. Just let it do its thing.
Kill the heat, let it sit covered for another 5-6 minutes, then fluff with a fork. You’ll get individual grains that are creamy but not mushy, perfect for soaking up peri peri sauce.
Making It Look Good
Your chicken’s done, it’s rested for 5-7 minutes (you didn’t skip this, right?), and now you need to plate it like you know what you’re doing.
Transfer it to a clean platter. Grab those lemons you’ve been ignoring—cut 3-4 of them in half and throw them on the grill cut-side down for 1-2 minutes. Grilled lemons are softer, easier to squeeze, and have this smoky thing going on that regular lemons don’t.
Arrange them around the chicken. Hit the whole thing with one last generous brush of that finishing sauce so it glistens.
Done. That’s it. Bring it to the table while it’s still hot and watch people lose their minds.
Real Questions People Actually Ask
Can I skip the whole chicken and just use breasts?
Yeah, bone-in skin-on breasts work great. They need 25-30 minutes on the grill instead of 35-40. Boneless breasts work too but cook fast—15-20 minutes max—and they dry out if you breathe on them wrong, so watch carefully.
How spicy is this really?
Depends entirely on your peppers and whether you keep the seeds. Fresno peppers with seeds removed = mild heat that most people handle fine. Bird’s eye chilies with seeds = actual spicy. Start conservative. You can always add more heat next time.
What if I literally cannot find any of these peppers?
Dried bird’s eye chilies from the Asian section work—just soak them in warm water first. Red pepper flakes in a pinch (start with 2 teaspoons). Fresh is better, but dried beats nothing.
Can I make this fast without the long marinade?
You can, but it won’t be as good. Even 4 hours beats 30 minutes. If you’re desperate, at least do the lemon-salt treatment and give the main marinade 2 hours minimum. It’s the bare minimum for decent flavor.
Does this freeze?
The marinade freezes great for 3 months. Cooked chicken keeps in the fridge 3-4 days, freezes for 2 months, but the skin gets sad when you reheat it. Best move? Freeze extra marinade in portions so you’re always ready to make fresh chicken.
Why You Should Actually Make This
Look, this isn’t a throw-it-together weeknight dinner. Between prep, marinating, and cooking, you’re investing real time. But here’s what you get: chicken that people remember. The kind of meal that gets requested at every gathering. A recipe you’ll make for the rest of your life.
That butterflying technique? You’ll use it for everything. The marinade approach? Works on pork, lamb, whatever. The confidence to let food char instead of panicking? Game-changer.
Grab a chicken this weekend. Set it up in a marinade tomorrow. Grill it on Saturday. Once you taste chicken with actual flavor—crispy skin, juicy meat, that perfect balance of heat and citrus—you’ll get why this recipe traveled from a small town in Mozambique to backyards across the world.
Your grill is waiting. Your neighbors are already curious. Give them something to be jealous about.