Table of Contents
Let me tell you about the time I tried to impress my in-laws with homemade cheesecake.
I spent three hours watching YouTube tutorials, another hour at the grocery store buying a springform pan I’d never use again, and approximately 47 minutes wrapping the whole contraption in aluminum foil for this mysterious “water bath” everyone kept talking about.
The result? A cracked, lopsided mess that looked like it had survived a small earthquake. My mother-in-law smiled politely and said it “had character.” My husband ate it anyway because he’s sweet like that, but we both knew the truth—I’d bombed spectacularly.
Here’s what nobody tells you about traditional cheesecake: it’s designed to make you feel inadequate. All those fancy techniques? They’re basically hazing rituals for home bakers.
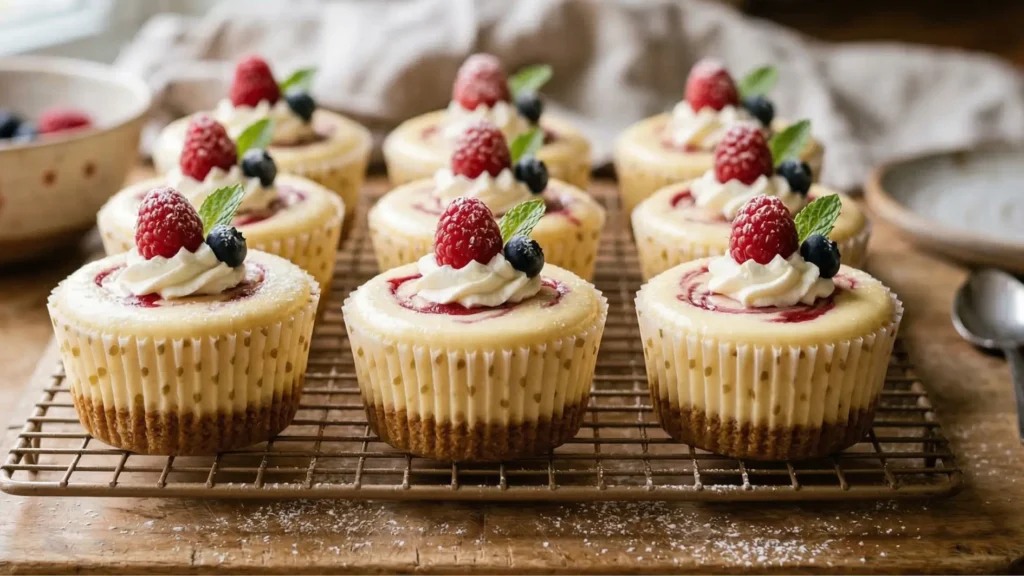
But then I stumbled onto easy cheesecake cupcakes, and suddenly everything clicked. No water bath drama. No springform pan that leaks, no matter how much foil you use. No holding your breath while a massive cheesecake bakes for 90 minutes, praying it won’t crack.
Just simple, foolproof mini cheesecakes that come out perfect every single time.
If you’ve been avoiding cheesecake because it seems too complicated, you’re in the right place. These cupcakes are about to save your reputation at potlucks and make you look like you actually know what you’re doing in the kitchen.
Why Easy Cheesecake Cupcakes Are Perfect for Beginners
Look, I’m not going to sugarcoat it—traditional cheesecake is a pain. You need equipment you’ll use once a year. You’ll need more patience than you have right now. You need to understand the precise moment when “jiggly” becomes “set” without actually touching anything, because apparently, looking at it wrong can cause cracks.
Easy cheesecake cupcakes throw all that nonsense out the window.
Your regular muffin tin? That’s all you need. The same one collecting dust in your cabinet right now works perfectly. No specialty pans with complicated latches. No wondering if you’ve assembled it correctly. Just a basic muffin tin and some paper liners.
The time difference alone will blow your mind. Traditional cheesecake takes over an hour to bake, then needs to cool for another hour, then chill overnight. These cupcakes? Twenty minutes in the oven. That’s it. You can literally make these after dinner and have them ready for dessert the same evening.
And can we talk about portion control? When you make a whole cheesecake, you’re committed. You’re eating cheesecake for days. You’re bringing it to work because there’s no way your household can finish it. You’re calculating whether it’s socially acceptable to eat cheesecake for breakfast (it is, by the way, but still).
With cupcakes, you get twelve perfect servings. Done. No awkward slicing where someone gets a tiny sliver and someone else gets a chunk the size of Texas. Everyone gets the same amount, and you look organized and thoughtful.
But here’s the real kicker—these actually turn out better for beginners than full-sized cheesecake. The smaller size means more consistent baking. No raw center while the edges turn to rubber. The temperature stays even throughout, so you get that creamy texture all the way through.
Plus, when something’s smaller, it’s just less scary. Making twelve little cheesecakes feels manageable. Making one giant cheesecake that might fail catastrophically? That’s intimidating.
Essential Ingredients for Easy Cheesecake Cupcakes
Good news—you probably have most of this stuff already. Nothing fancy. Nothing you need to special-order from some gourmet shop.
What You’ll Need (Simple Pantry Staples)
For the Crust:
- 1 cup graham cracker crumbs (about 8 full crackers)
- 3 tablespoons granulated sugar
- 4 tablespoons unsalted butter, melted
- Pinch of salt
For the Cheesecake Filling:
- 16 oz (2 packages) cream cheese, softened to room temperature
- ½ cup granulated sugar
- 2 large eggs, room temperature
- 1 teaspoon pure vanilla extract
- 2 tablespoons sour cream
- 1 tablespoon all-purpose flour
Optional Toppings:
- Fresh berries
- Whipped cream
- Chocolate sauce
- Caramel
- Whatever sounds good to you
Now, before you rush to start baking, let’s talk about the room temperature thing. I know you want to skip this step. Everyone does. I did for years.
Don’t.
Cold cream cheese is the enemy. It creates lumps that absolutely refuse to blend, no matter how long you beat the mixture. You’ll end up with a filling that looks like cottage cheese instead of smooth, creamy cheesecake. Not cute.
The same goes for the eggs. Cold eggs don’t mix in properly, and you’ll get a dense, heavy texture instead of that light, fluffy consistency that makes cheesecake so addictive.
Just set everything out on your counter for about an hour before you start. Go watch an episode of something. Fold some laundry. Answer emails. Let time do the work for you.
If you’re impatient (I get it), you can microwave the cream cheese in 10-second bursts. Just watch it carefully—you want it soft, not melted. Melted cream cheese is a different problem entirely.
That tablespoon of flour might seem random, but it’s actually doing important work. It helps the filling set up properly while keeping everything smooth and creamy. Some recipes leave it out, then wonder why their cupcakes turn out runny. Mystery solved.
When you’re shopping, grab the brick-style cream cheese, not the stuff in tubs. The spreadable kind has additives that mess with how it sets. And honestly, store-brand graham crackers work just as well as name-brand. Save your money for good vanilla extract—that’s where you’ll actually taste the difference.
Kitchen Tools You Already Own (No Special Equipment!)
This is my favorite part. You don’t need to buy anything.
Required Tools
- Standard 12-cup muffin tin
- 12 paper cupcake liners
- Mixing bowls (a couple of different sizes)
- Electric hand mixer or stand mixer
- Measuring cups and spoons
- Rubber spatula
- Cooling rack
Nice to Have (But Definitely Not Required)
- Food processor for crushing graham crackers
- Small cookie scoop for portioning filling
- Offset spatula for pretty topping application.
See what’s missing? All that stuff that made you think cheesecake was too hard. No springform pan. No roasting pan for the water bath. No aluminum foil origami. No thermometer. No cheesecake-specific anything.
Don’t have a food processor? Who cares. Throw your graham crackers in a ziplock bag, seal it up, and go to town with a rolling pin. Honestly, it’s kind of therapeutic. Bad day at work? Take it out on those graham crackers.
A can of beans works too if you don’t have a rolling pin. I’ve used a wine bottle before. Whatever’s heavy and won’t break.
Step-by-Step Instructions for Easy Cheesecake Cupcakes
Alright, let’s actually make these things. I’m going to walk you through every single step like you’ve never touched a cheesecake before, because maybe you haven’t.
Preparation (5 Minutes)
Step 1: Preheat and Prep
Turn your oven to 325°F. Notice that’s lower than most baking recipes you’ve seen. There’s a reason for that.
High heat makes cheesecake crack. It’s like a law of physics or something. The outside cooks faster than the inside, everything contracts at different rates, and boom—Grand Canyon running across your dessert.
Low and slow is the way to go. It gives everything time to cook evenly without any dramatic temperature shocks.
While your oven’s heating up, line your muffin tin with paper liners. Some people skip this step and grease the tin instead, but liners make your life so much easier. They peel right off, cleanup is minimal, and honestly, they just look nicer.
Your cream cheese and eggs should be sitting out already, getting friendly with room temperature. Give the cream cheese a poke—it should dent easily. If it’s still firm, give it more time.
Making the Graham Cracker Crust (5 Minutes)
Step 2: Prepare the Crust
Crush your graham crackers into fine crumbs. A food processor makes this easy, but the ziplock bag method works great, too. Just keep smashing until everything’s pretty fine—you don’t want big chunks, but don’t stress about making it powder-fine either.
Mix your crumbs with sugar, melted butter, and a little pinch of salt. Stir it around until it looks like wet sand. Here’s the test: grab a handful and squeeze it. When you open your fist, it should hold together. If it falls apart immediately, add a tiny bit more melted butter.
Divide this mixture among your twelve cupcake liners—about a tablespoon in each one. Now here’s where people mess up: you’ve got to press it down HARD. Don’t be gentle. Use the back of a spoon or the bottom of a small glass and really pack it in there.
If you’re wimpy about this step, you’ll end up with a crumbly bottom instead of an actual crust. Nobody wants that.
Pop the whole thing in the oven for five minutes. This step sets the crust and makes it taste better—more toasty and buttery. When the timer goes off, pull it out and let it cool a bit while you make the filling.
Creating the Creamy Cheesecake Filling (10 Minutes)
Step 3: Mix the Filling
Put your softened cream cheese in a big bowl and beat it with your mixer on medium speed for a solid two to three minutes. You want it completely smooth and fluffy-looking.
Stop every minute or so and scrape down the sides of the bowl. Cream cheese is sneaky—it hides in the corners and refuses to blend in. Scrape it down, keep beating, scrape again.
Why beat the cream cheese by itself first? Because once you add the eggs, you can’t over-mix. Too much mixing after the eggs go in creates too much air, which leads to cracks and sinking. So you’ve got to get the cream cheese perfectly smooth BEFORE you’re on the clock.
Add your sugar and beat for another minute or two until it’s well combined. The mixture should look lighter and airier.
Now—and this is important—switch to LOW speed. Add your eggs one at a time, and only mix until each one disappears into the batter. Don’t keep beating. Don’t try to make it extra fluffy. Just mix until combined, then stop.
Add your vanilla, sour cream, and flour. Mix on low just until you can’t see any streaks. Then stop immediately.
The batter should be smooth and creamy. If you see lumps, your cream cheese wasn’t soft enough to start with. You can pour it through a strainer to remove them, but that’s annoying and takes forever. Better to just make sure your cream cheese is soft from the beginning.
Baking Your Easy Cheesecake Cupcakes (20-25 Minutes)
Step 4: Fill and Bake
Divide your filling among the twelve liners, filling each about three-quarters full. They’ll puff up a little while they bake, so don’t overfill.
Pick up your muffin tin and tap it on the counter a couple of times—not hard enough to spill, just firm enough to bring air bubbles to the surface. You’ll see little bubbles pop up and burst. This prevents holes in your finished cupcakes.
Stick the tin in the middle of your oven and set a timer for 20 minutes.
When it goes off, open the oven and gently shake the pan. The edges should look set and firm, but the centers should still jiggle. Like jello. That jiggly center is SUPPOSED to be there.
This is where beginners panic. Your brain is screaming that they look raw. You want to leave them in longer. Everything in you says these aren’t done.
Trust me. They’re done. They’ll firm up completely while they cool. If you bake them until the centers look set, you’ll end up with dry, overcooked cheesecake that tastes like sweet scrambled eggs.
The jiggle is your friend. Embrace the jiggle.
When they’re ready, turn off the oven but DON’T take them out yet. Crack the door open a few inches and let them hang out in there for 10 minutes.
This gradual cooling prevents the shock of going from a hot oven to cool kitchen, which causes cracks and sinking. It’s like letting them ease into retirement instead of getting laid off suddenly.
After 10 minutes, take them out and set the whole tin on a cooling rack. Let them cool completely at room temperature—about 30 minutes.
Chilling and Serving (Minimum 2 Hours)
Step 5: Refrigerate and Top
Once they’re room temperature, cover the tin with plastic wrap and stick the whole thing in your fridge. They need at least two hours to chill properly, but overnight is even better.
The chilling does two things: it firms everything up so the texture is perfect, and it lets all the flavors develop and blend together. Warm cheesecake tastes okay. Cold cheesecake tastes amazing.
When you’re ready to serve, add whatever toppings sound good. Fresh berries, whipped cream, chocolate, caramel—go wild. Just wait until right before serving to add them so they look fresh and don’t make everything soggy.
These’ll keep in the fridge for about five days in an airtight container. Though honestly, I’ve never had a batch last that long.
Pro Tips for Perfect Easy Cheesecake Cupcakes Every Time
After making these about a million times, here’s what I’ve learned the hard way so you don’t have to.
Avoiding Common Beginner Mistakes
Temperature is everything. Room temperature ingredients blend smoothly. Cold ingredients create lumps and a dense texture. Lower oven temperature prevents cracks. Gradual cooling prevents sinking. It all comes back to temperature.
Stop mixing earlier than you think you should. The second everything looks combined, stop. Over-mixing is the number one reason cupcakes crack or sink. You can’t un-mix, so err on the side of under-mixing.
That jiggle means they’re done. I know it looks wrong. I know it seems underbaked. It’s not. The residual heat and the cooling process will finish cooking them. If they look fully set in the oven, they’re overcooked.
If your cupcakes crack anyway, don’t freak out. Pile on some whipped cream or berries. Nobody will know, and honestly, they’ll taste the same.
If they sink in the middle, you over-mixed after adding the eggs. They’ll still be delicious—just fill those little wells with chocolate sauce or jam and pretend you meant to do it.
5 Delicious Flavor Variations for Easy Cheesecake Cupcakes
Once you’ve nailed the basic recipe, mix things up with these simple tweaks.
Chocolate Easy Cheesecake Cupcakes: Replace two tablespoons of the cream cheese with cocoa powder. Use crushed Oreos instead of graham crackers for the crust. Top with chocolate ganache. Basically, chocolate heaven.
Strawberry Swirl: Stir two tablespoons of strawberry jam into your finished filling, then swirl it through each cupcake with a toothpick before baking. Top with fresh strawberries. Looks fancy, tastes amazing, takes zero extra effort.
Lemon Blueberry: Add a tablespoon of lemon zest to your filling. Top with blueberry compote after chilling. Perfect for summer, or when you want to pretend it’s summer during a February blizzard.
Salted Caramel: Make the basic recipe, then drizzle generously with caramel sauce and sprinkle with flaky sea salt before serving. The sweet-salty combo is dangerously addictive.
Pumpkin Spice: Mix in half a cup of pumpkin puree and a teaspoon of pumpkin pie spice. Use gingersnap cookies instead of graham crackers for the crust. Your fall gathering just got a signature dessert.
Frequently Asked Questions About Easy Cheesecake Cupcakes
Can I make these without a mixer?
Yeah, but your arm’s going to hurt. Make sure your cream cheese is super soft—almost spreadable—and whisk hard until it’s completely smooth. It takes longer and requires actual muscle, but it works.
Why did mine crack?
Three reasons: you mixed too much after adding the eggs, your oven was too hot, or you cooled them too fast. Make sure you’re at 325°F and let them cool gradually in the oven with the door cracked.
How do I know when they’re done?
The edges should look set, but the centers should jiggle when you gently shake the pan. They’ll look almost underdone. That’s correct. They firm up while cooling. If you bake them until they look done, they’re overcooked.
Can I use low-fat cream cheese?
Please don’t. Low-fat cream cheese has more water and less fat, which means watery, sad cupcakes that don’t set right and don’t taste good. Full-fat or go home.
Do these need to stay in the fridge?
Yes. They’re made with dairy and eggs, so they’ve got to be refrigerated. They can sit out for a couple of hours while you’re serving them, but they belong in the fridge otherwise.
Can I make these ahead?
Absolutely. Make them two or three days before your event. They actually taste better after sitting in the fridge for a while. You can even freeze them for up to two months. Just add toppings right before serving.
How do I get them out of the pan?
If you used cupcake liners, just lift them out. Easy. If you didn’t use liners (why didn’t you use liners?), run a knife around the edge and lift carefully.
Why did mine sink?
You over-mixed the batter after adding the eggs, which incorporated too much air that deflated during cooling. Or you opened the oven door during baking. Or you didn’t let them cool gradually. Next time, mix less and cool gradually in the oven.
Your Journey to Easy Cheesecake Cupcake Success Starts Now
Look, I’m not going to tell you these will change your life or make you a master baker overnight.
But they might change how you think about baking.
Because here’s the thing—most people avoid making impressive desserts not because they can’t do it, but because they think they can’t. They’ve been told cheesecake is hard. They’ve been intimidated by complicated recipes with seventeen steps and fancy equipment.
These easy cheesecake cupcakes prove that’s all nonsense.
You don’t need special training. You don’t need expensive tools. You need a muffin tin, some basic ingredients, and about 30 minutes.
That’s it.
And when you pull these out of your fridge, and people’s faces light up? When someone asks where you bought them, and you get to say, “I made them”? When you realize you just created something genuinely impressive without breaking a sweat?
That’s when you’ll get it.
Baking doesn’t have to be scary. It can actually be fun, easy, and satisfying.
So grab your ingredients. Turn on your oven. Permit yourself to try something new.
Even if they’re not perfect—and honestly, mine rarely are—they’ll taste absolutely delicious. And next time, you’ll be even better.
Make these cupcakes. Impress yourself. Then come back and tell me how it went.
Seriously, I want to hear about your experience. Drop a comment below and let me know how your cupcakes turned out. Did you try any flavor variations? Did anything go wrong? Did everything go surprisingly right? And if you’ve got photos, share them—I love seeing what people create!
Save this recipe. Text it to your friend who thinks she can’t bake. Make a batch this weekend. You’ve got this.